


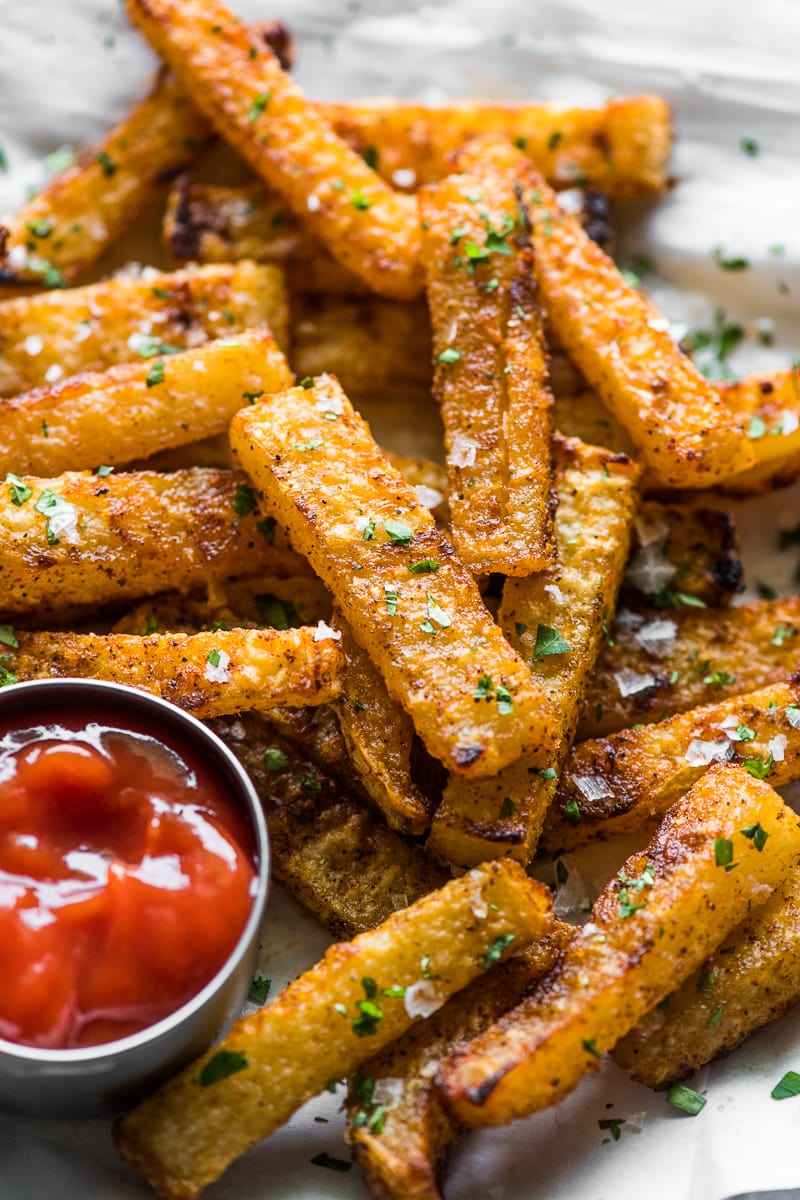
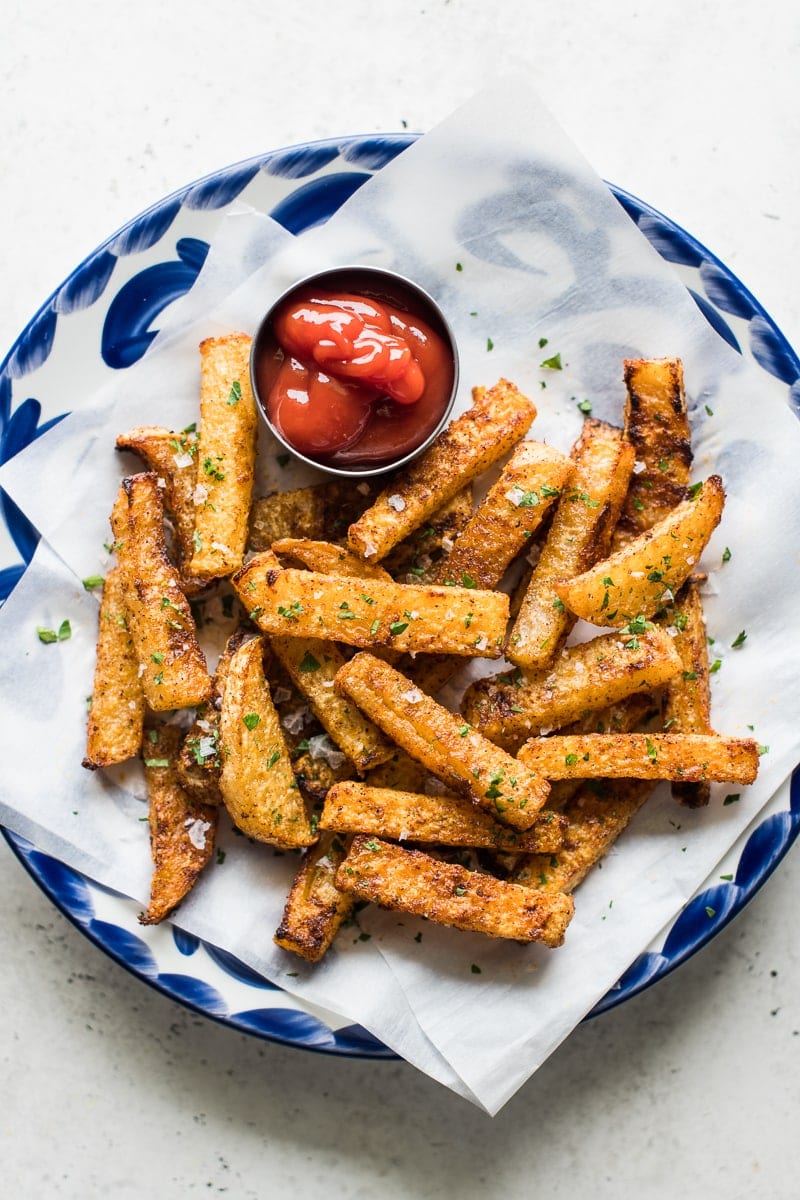
Crispy on the outside, tender on the inside, and made with just 5 ingredients, these jicama fries are a lower-carb swap for regular fries that actually taste like the real thing. Great as a side, snack, or appetizer.
A Note from Isabel

Jicama fries are my favorite way to cook jicama, and if you’ve only ever eaten it raw, this is going to surprise you. Growing up, jicama showed up at our house cut into sticks with lime squeezed over the top and a little chili powder or chili lime seasoning like Tajín, eaten cold and crunchy like a snack. Baking it into fries is a whole different thing. It softens up, the edges get golden and crispy, and it turns into something you’ll want to dunk in ketchup or ranch.
They’re naturally low in carbs and high in fiber, so they fit keto, paleo, gluten free, and vegan diets. But honestly I make them because they’re good, not because they check a box. If you’ve been missing fries, these are the closest veggie version I’ve found.
What Are Jicama Fries?
Jicama is a root vegetable native to Mexico that you can eat raw or cooked. It looks a lot like a potato or a turnip, with rough brown skin and crisp white flesh inside. But it doesn’t taste like a potato at all. It’s juicy and mild, kind of like a cross between an apple, a water chestnut, and a pear, with a little natural sweetness.
Jicama fries are just jicama peeled, sliced into sticks, softened, then baked or air-fried until crispy. Once they’re seasoned and browned, they get pretty close to a regular French fry: crispy edges, tender middle. The flavor stays mild, so they take on whatever you season them with. I go basic with garlic and smoked paprika here, but they’re just as good with chili lime, Cajun, or garlic parmesan (more on that below).
One thing to know: jicama is naturally low in carbs and loaded with fiber, which is why it works for keto, paleo, gluten free, and vegan eating.

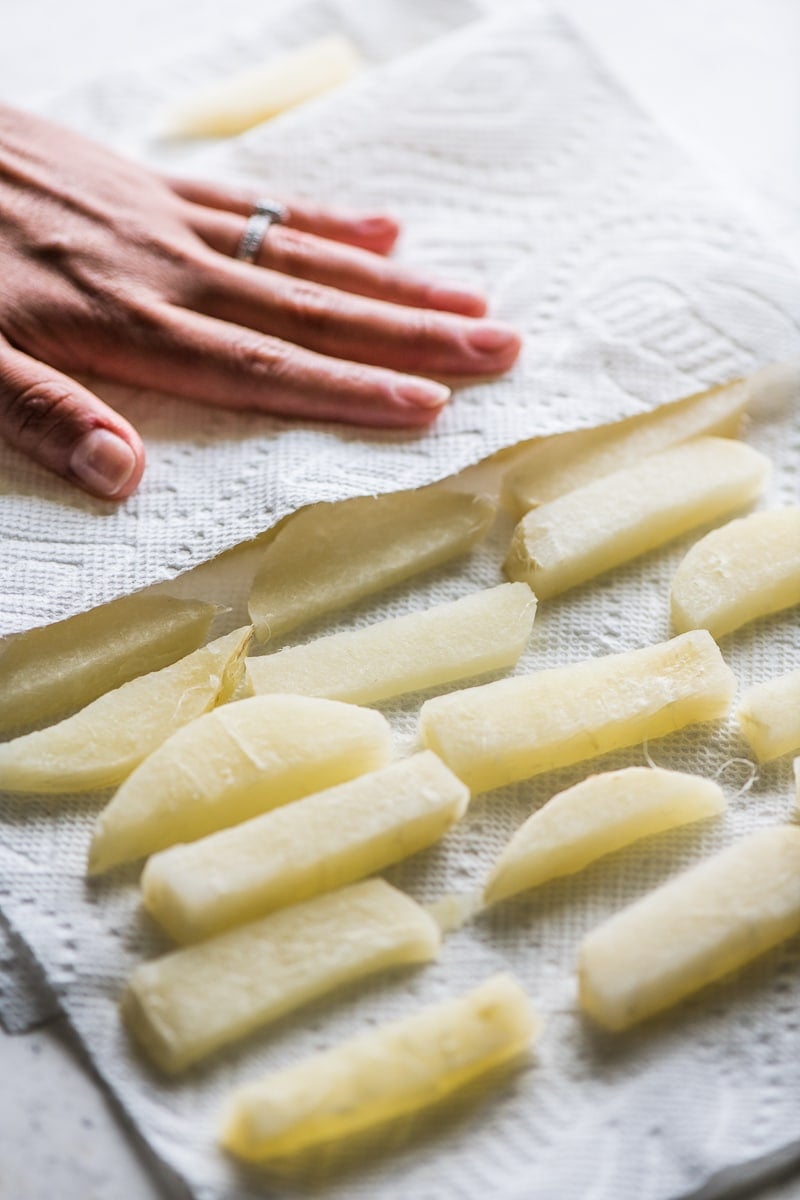
How to Peel and Cut Jicama
The skin on jicama is thick and a little tough, and you don’t want to eat it (only the white flesh inside is safe to eat). A regular vegetable peeler works if your jicama is on the smaller side, but for bigger ones, I find it easier to grab a knife.
Here’s how I do it:
- Slice off both ends so the jicama sits flat.
- Stand it up and cut the skin off in strips from top to bottom, following the curve. Go deep enough to get past the fibrous layer just under the brown skin.
- Cut the peeled jicama into even slabs, then stack a few and slice them into sticks. Try to keep them about the same thickness so they cook evenly. Thinner sticks crisp up more, so don’t cut them too chunky.

How to Make Jicama Fries
- Peel the jicama and slice it into even sticks.
- Add the sticks to a microwave-safe bowl with water, cover, and microwave for 10 minutes to soften. Drain.
- Dry the jicama really well with paper towels. The drier it is, the crispier it gets.
- Toss with olive oil and seasonings, spread in a single layer, and bake at 400°F for 35 to 40 minutes, flipping halfway, until golden and crispy.
Air Fryer Jicama Fries
If you’ve got an air fryer, it’s honestly the easiest way to get these extra crispy since it dries the jicama out as it cooks. Prep the fries the same way (peel, slice, microwave, and pat dry), then toss them with the oil and seasonings.
Air fry at 390°F for about 10 minutes, shaking the basket halfway through so they cook evenly. Depending on your air fryer and how thick you cut them, you might need a few extra minutes. Pull them when the edges are golden and crispy. Work in batches if you need to so they’re in a single layer and not crowded, that’s what keeps them from steaming instead of crisping.
Tips
- Cut them evenly. Same-size sticks cook at the same rate, so you don’t end up with some burnt and some still crunchy.
- Get the jicama as dry as possible. After you drain it, really press the sticks with paper towels. Leftover moisture is the enemy of crispy fries.
- Don’t skip the softening step. Jicama holds a lot of water and stays crunchy if you bake it raw. Microwaving it first softens the inside so it actually turns tender like a fry.
- Give them space. Spread the fries in a single layer with room between them. Crowded fries steam instead of crisp. Use two baking sheets if you need to.
- Don’t expect a potato. Jicama is firmer than a potato even after cooking, so the texture is a little crisper in the middle. Still really good, just a heads up if it’s your first time.
Frequently Asked Questions
Do I have to microwave or boil the jicama first?
Yes, I’d soften it first. Jicama holds a lot of water and stays crunchy if you bake it straight from raw. Microwaving (or boiling) it for about 10 minutes softens the inside so it actually gets tender like a real fry.
Are jicama fries keto and low carb?
Yes. Jicama is naturally low in net carbs and high in fiber, which is why it works for keto, paleo, gluten free, and vegan eating.
Can I make them without a microwave?
Totally. Just boil the sliced jicama in a pot of water for about 10 minutes instead, then drain and pat dry before seasoning.
Why are my jicama fries soggy?
Almost always too much moisture or a crowded pan. Pat the jicama really dry after softening it, and spread the fries out in a single layer so they roast instead of steam.
Variations
The garlic, smoked paprika, and salt combo is a solid basic fry seasoning, but jicama’s mild flavor makes it a blank canvas, so it’s easy to switch things up.
- Chili lime. My favorite, and the way I love eating jicama. Toss the baked fries with Tajín or your favorite chili lime seasoning and a squeeze of fresh lime for something tangy, salty, and a little spicy.
- Garlic parmesan. Melt 1 tablespoon of butter with ½ teaspoon garlic powder, toss the fries in it, then add freshly grated parmesan, flaky salt, and chopped parsley.
- Spicy. Add a pinch of cayenne or some chili powder to the seasoning before baking.
- Herby. Mix in dried or fresh rosemary, thyme, parsley, or sage for a more savory, herbal flavor.
Serving Suggestions
I eat these the same way I’d eat regular fries, with ketchup, mustard, or a little ranch. But jicama fries can hang with way more than that. A few dips and sauces I’d reach for:
They’re also a great side for burgers, grilled chicken, carne asada, or anything you’d normally serve with fries.
-
Preheat the oven to 400°F. Line two large baking sheets with parchment paper and set aside.
-
Add the peeled jicama fries to a large microwave-safe bowl. Add the water, cover with plastic wrap or a plate, and microwave on high for 10 minutes.
-
Carefully remove the bowl from the microwave (it will be very hot), and drain the water.
-
Gently pat the jicama with paper towels to remove any excess water and moisture. Try to get it as dry as possible.
-
Transfer the jicama to a large bowl and toss with the olive oil, smoked paprika, salt, and garlic powder.
-
Arrange the fries on the prepared baking sheet in a single layer.
-
Bake for 35-40 minutes, flipping the fries over halfway through baking, until they’re browned and crispy on both sides.
Prevent your screen from going dark
- No microwave? Boil the jicama sticks in a pot of water for 10 minutes instead, then drain and pat dry.
- Air fryer. Prep as directed, then air fry at 390°F for about 10 minutes, shaking the basket halfway, until crispy.
- Storage. Jicama fries are best fresh, but leftovers keep in an airtight container in the fridge for 3 to 5 days.
- Reheating. Bake on a parchment-lined sheet at 350°F for about 15 minutes, until warmed through and crisp again.
- Freezing. Freeze the fries after seasoning but before baking. Spread on a baking sheet to freeze, then transfer to a freezer bag for up to 3 months. Bake from frozen, adding a few extra minutes.
Serving: 1/6th of recipe | Calories: 147kcal | Carbohydrates: 20g | Protein: 2g | Fat: 7g | Saturated Fat: 1g | Sodium: 204mg | Potassium: 337mg | Fiber: 11g | Sugar: 4g | Vitamin A: 210IU | Vitamin C: 44mg | Calcium: 26mg | Iron: 1mg
Nutrition information is automatically calculated, so should only be used as an approximation.
This recipe post was originally published in May 2020 and has been updated with more helpful tips so you can have success on the first try!