


Cannoli cake combines soft vanilla cake layers with a ricotta and mascarpone cannoli-filling-inspired frosting. I add mini chocolate chips, but you can of course use your favorite toppings like chopped pistachios or candied fruit. Recipe includes a how-to video!

Cannoli Cake: The Best of Two Great Desserts!
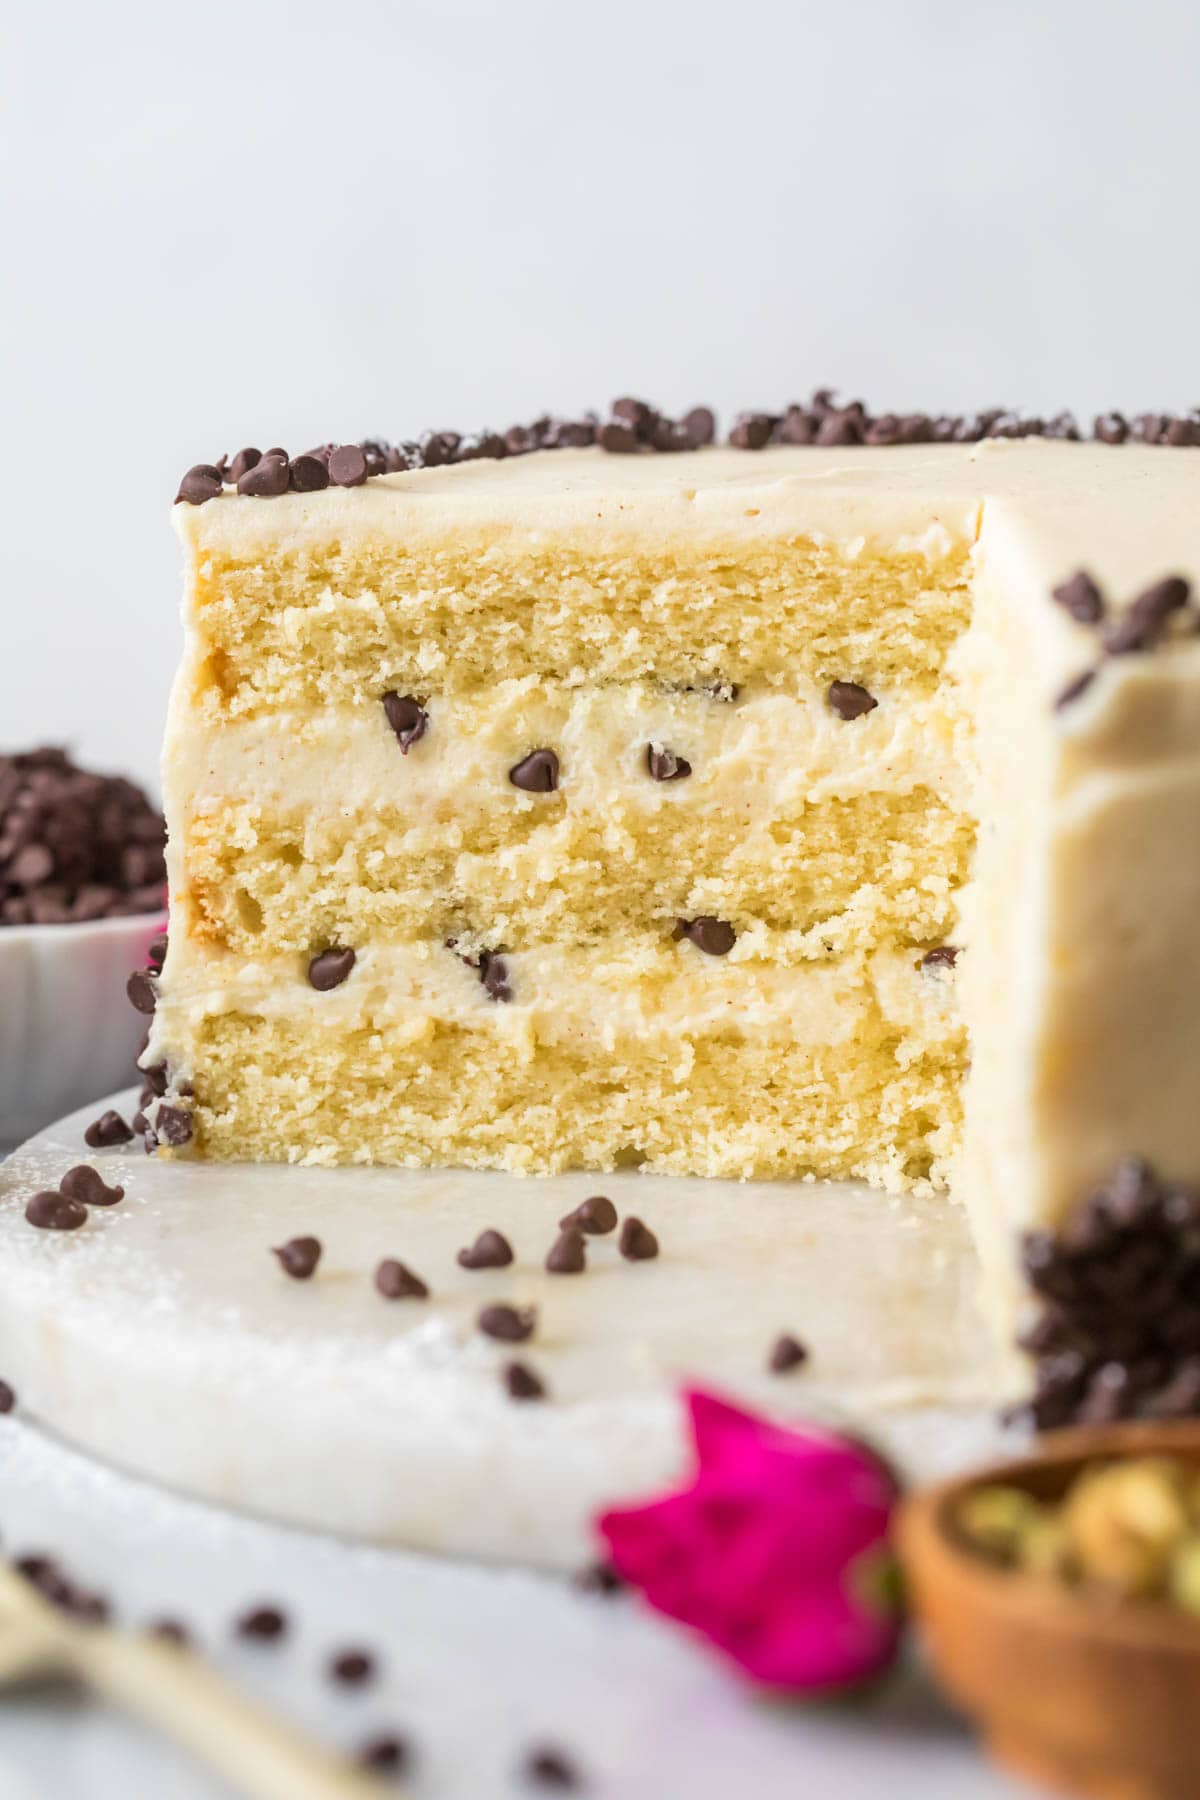
Today I’m transforming one of my favorite Italian desserts into a beautiful layer cake! This cannoli cake is made with three soft, tender, and moist vanilla cake layers (I borrowed heavily from my chantilly cake to make these) cloaked in a frosting inspired by cannoli filling. These components works beautifully together to give the cake a true cannoli feel.
Why You’ll Love This Recipe
- Seriously irresistible frosting that tastes just like cannoli filling. This is the true star of this recipe! It’s made without butter, and is perfectly balanced with the right sweetness level. I could eat it by the spoonful 😋
- Uses the reverse creaming method, which creates a tender, slightly dense crumb AND as a plus, is very hard to over-mix (so it’s great for beginner bakers!). I first shared this method years ago with my caramel cake, and I’ve been a fan ever since!
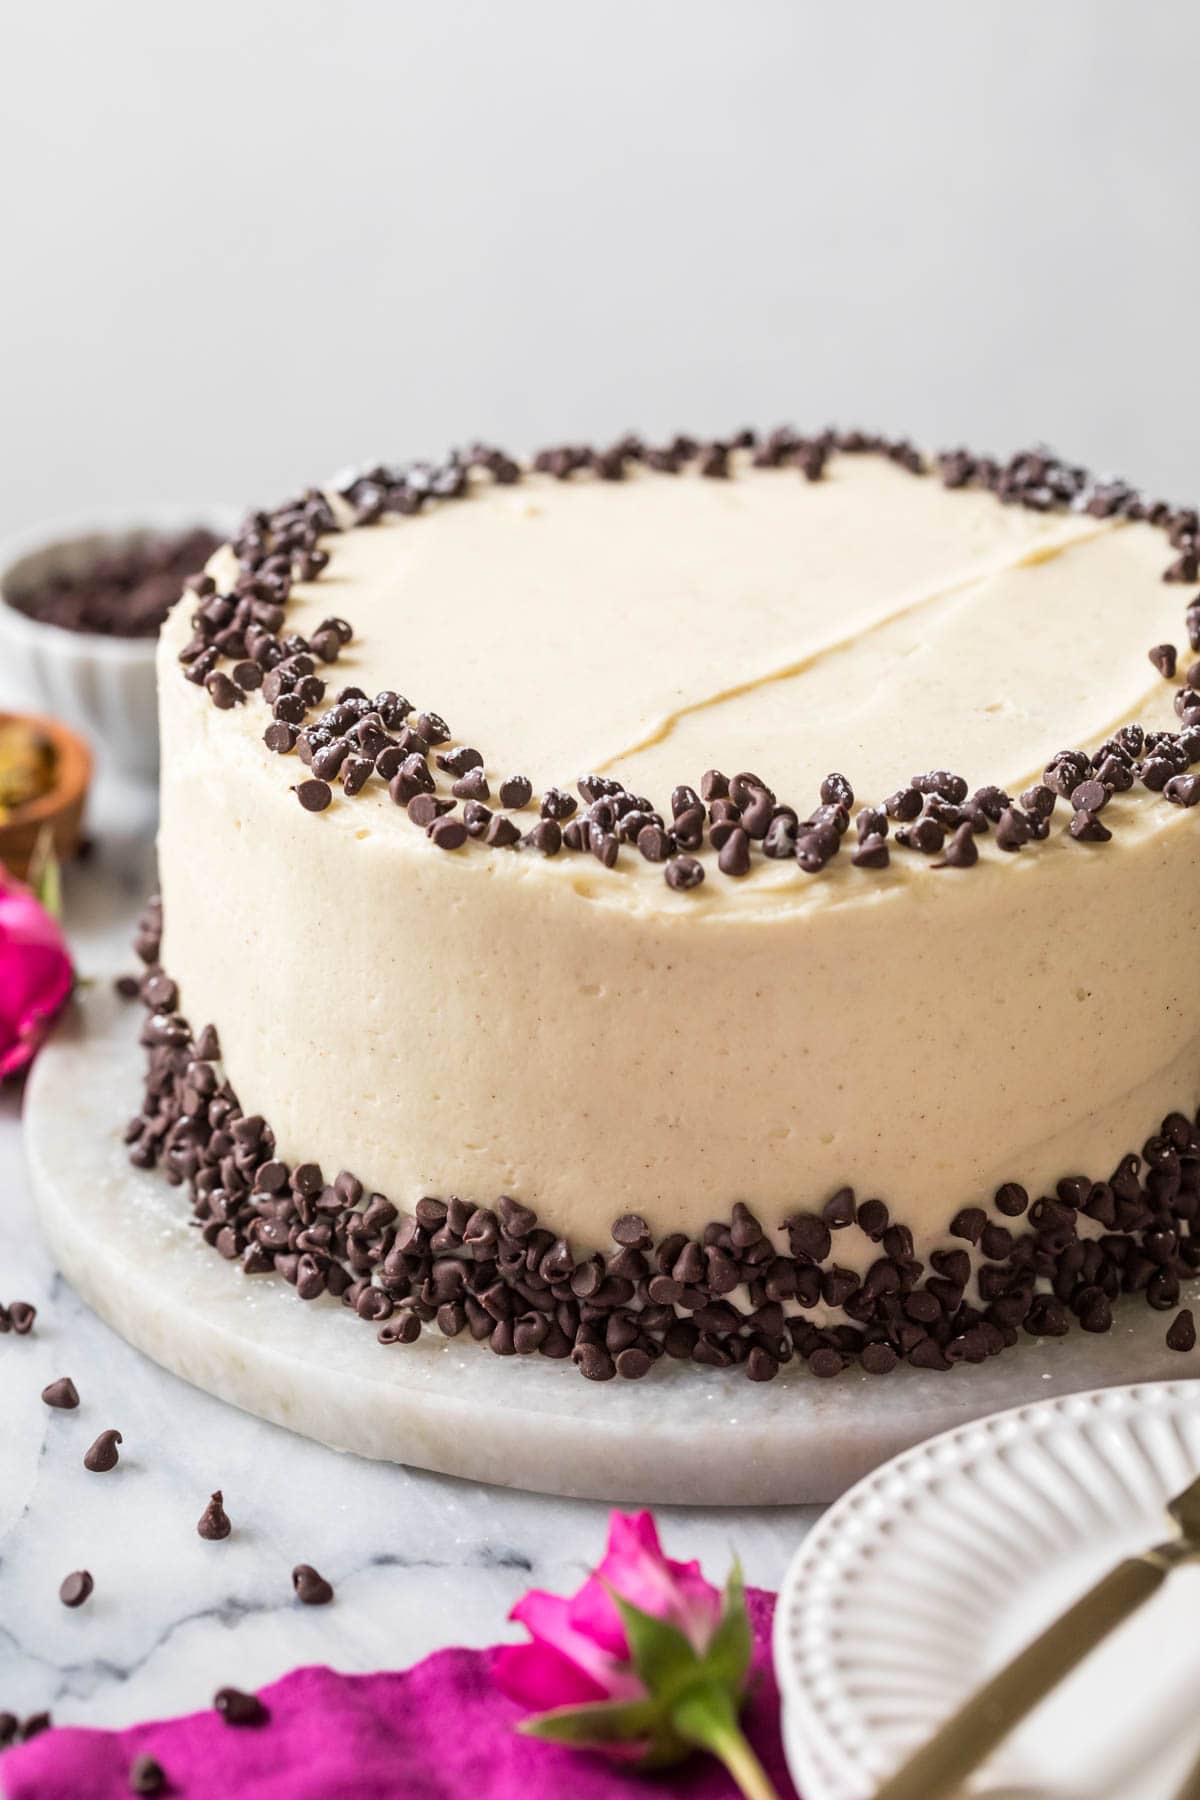
- Easy decoration and assembly. I just use chocolate chips to decorate my cannoli cake, but you could get fancy with it and add chopped pistachios or even add some mini cannoli on top!
- Perfect for a crowd. Instead of filling a bunch of cannoli shells, why not just serve an equally tasty cannoli cake?
This cannoli cake would be the perfect finale to an Italian-inspired dinner, like my penne alla vodka or baked ziti!
Ingredients
We’ll use a few key ingredients to achieve a flavorful, tender cake with a classic cannoli taste.
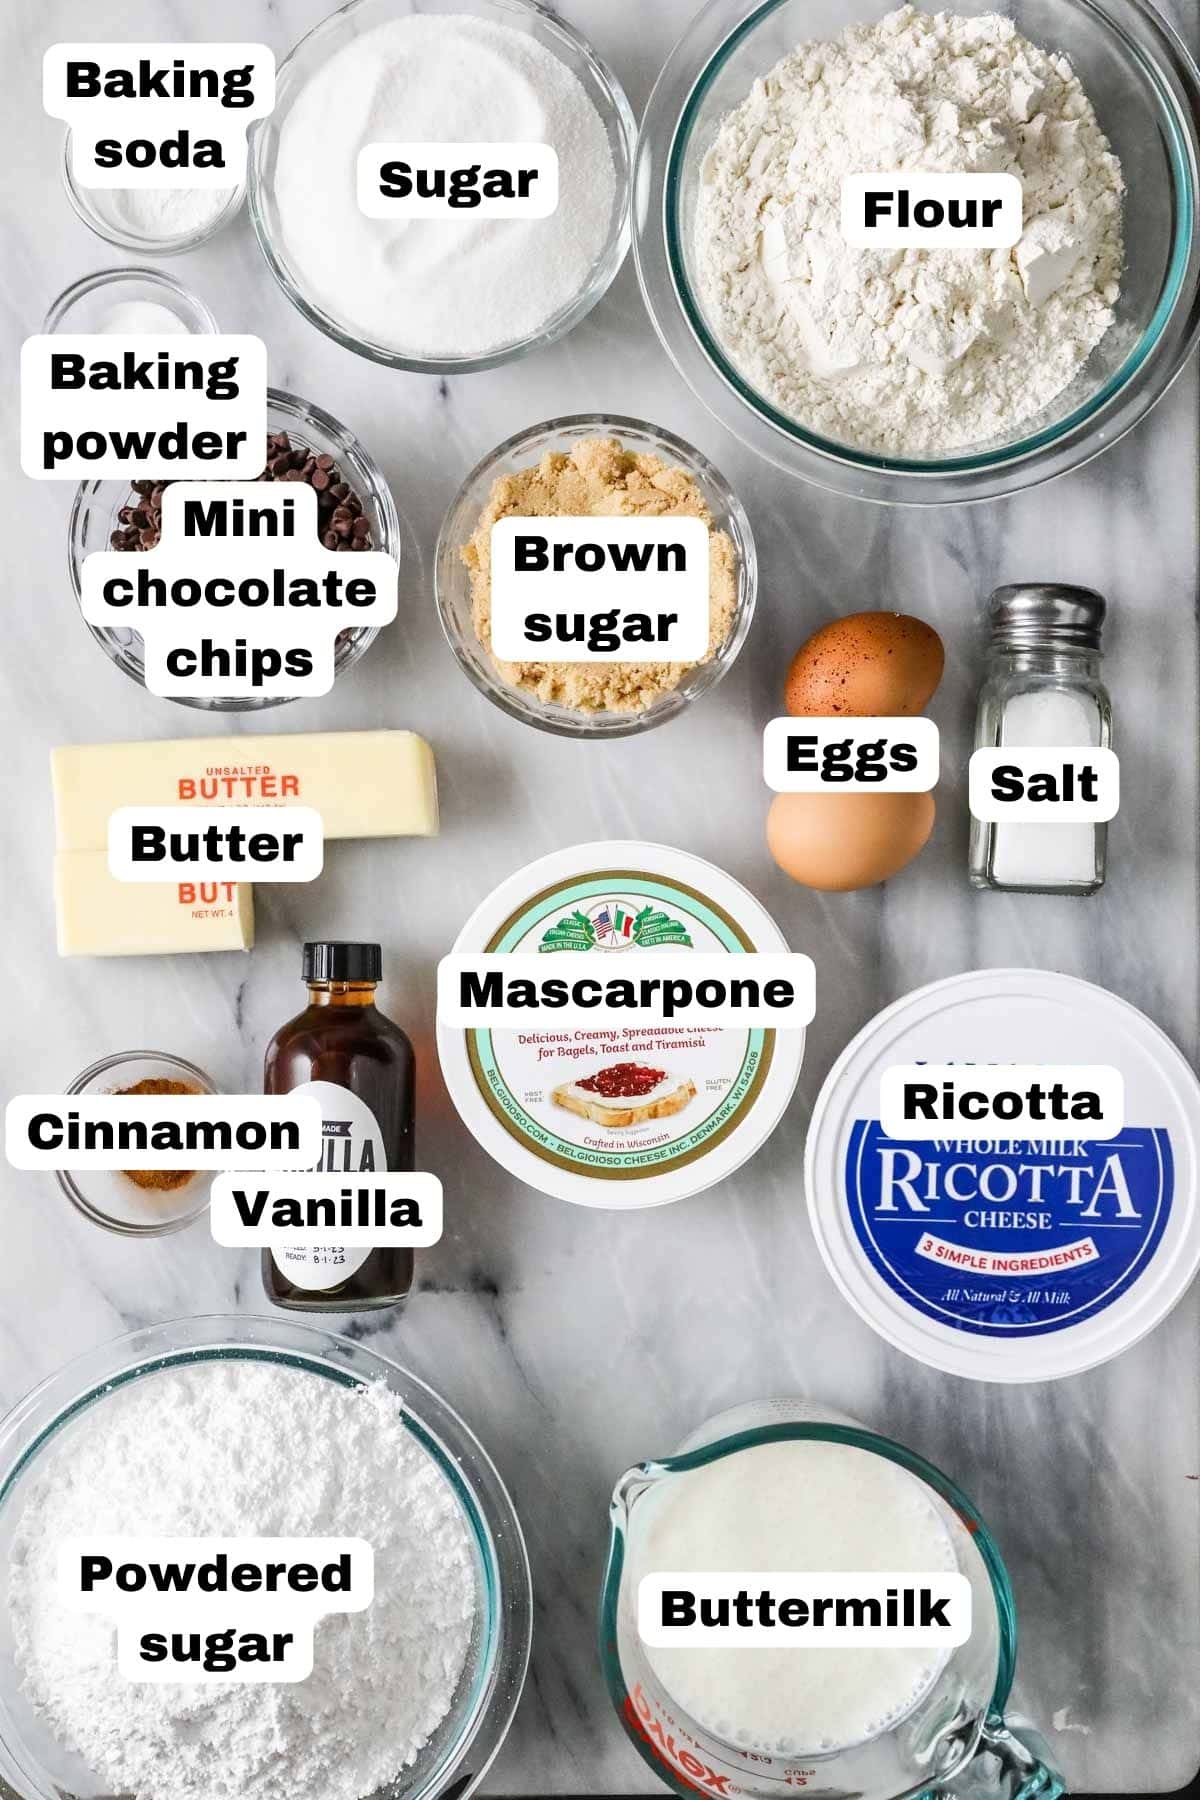
- Ricotta. Just like when making my lasagna recipe, you want to make sure to use whole milk ricotta here. We will be straining this before adding it to our frosting; this ensures our frosting will have the right texture, otherwise it would be too runny.
- Buttermilk. My easy buttermilk substitute will work in a pinch, but real buttermilk will provide the best flavor and moisture.
- Softened butter. Unlike many cake recipes, we will not be creaming the butter and sugar together for this cannoli cake. Instead, we will be beating the butter into the dry ingredients one tablespoon at a time. This is the reverse creaming method! It’s a bit different than the norm, but I love the results and use it in many recipes (like my caramel cake and snickerdoodle cake).
- Mascarpone. A key component you might recognize from making tiramisu, mascarpone adds flavor to our frosting alongside the ricotta. Make sure to bring yours out of the fridge for just 15-20 minutes beforehand; if it’s too cold or warm, it can be a challenge to work with.
- Cinnamon. This rounds out the flavor of the frosting and really adds to that authentic cannoli taste!
SAM’S TIP: As always, room temperature eggs are best here. They will break up and combine with your other ingredients MUCH more easily if they aren’t straight from the fridge. If you forget to set your eggs out ahead of time, use my trick to quickly bring eggs to room temperature.
This is just an overview of the ingredients I used and why. For the full recipe and video, please scroll down to the bottom of the post!
How to Make Cannoli Cake
Strain the Ricotta
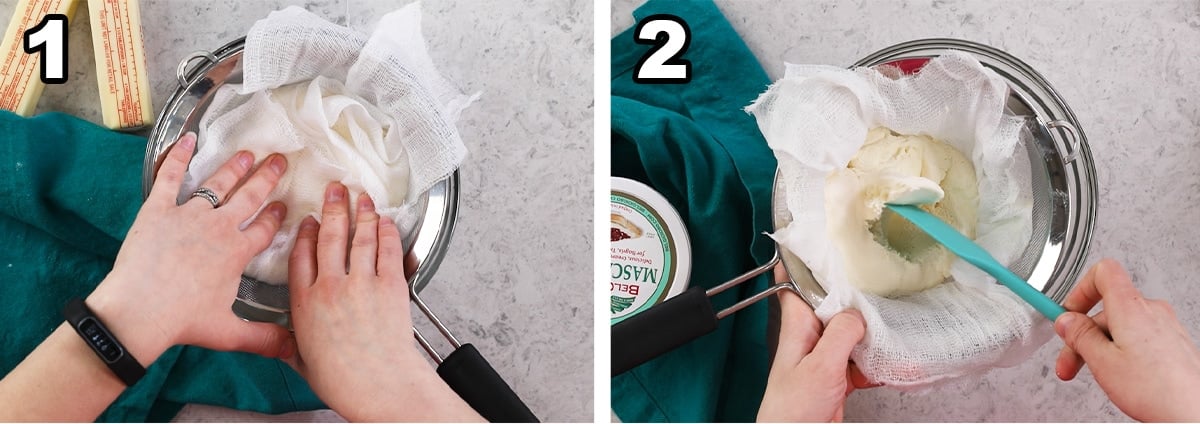
- Place a strainer over a mixing bowl (don’t let it touch the bottom) and add two layers of cheesecloth. Layer the ricotta on top and wrap it in the cheesecloth, then place something heavy on top (I use a big can of tomatoes). Let this sit in the fridge at least 4 hours or overnight.
- Once strained, you will notice that the ricotta is much drier–this is perfect! Now we can add it to our frosting without adding too much moisture. You can keep this in the fridge until you’re almost ready to make the frosting (take it out about 15-20 minutes beforehand).
Prepare the Cake Layers
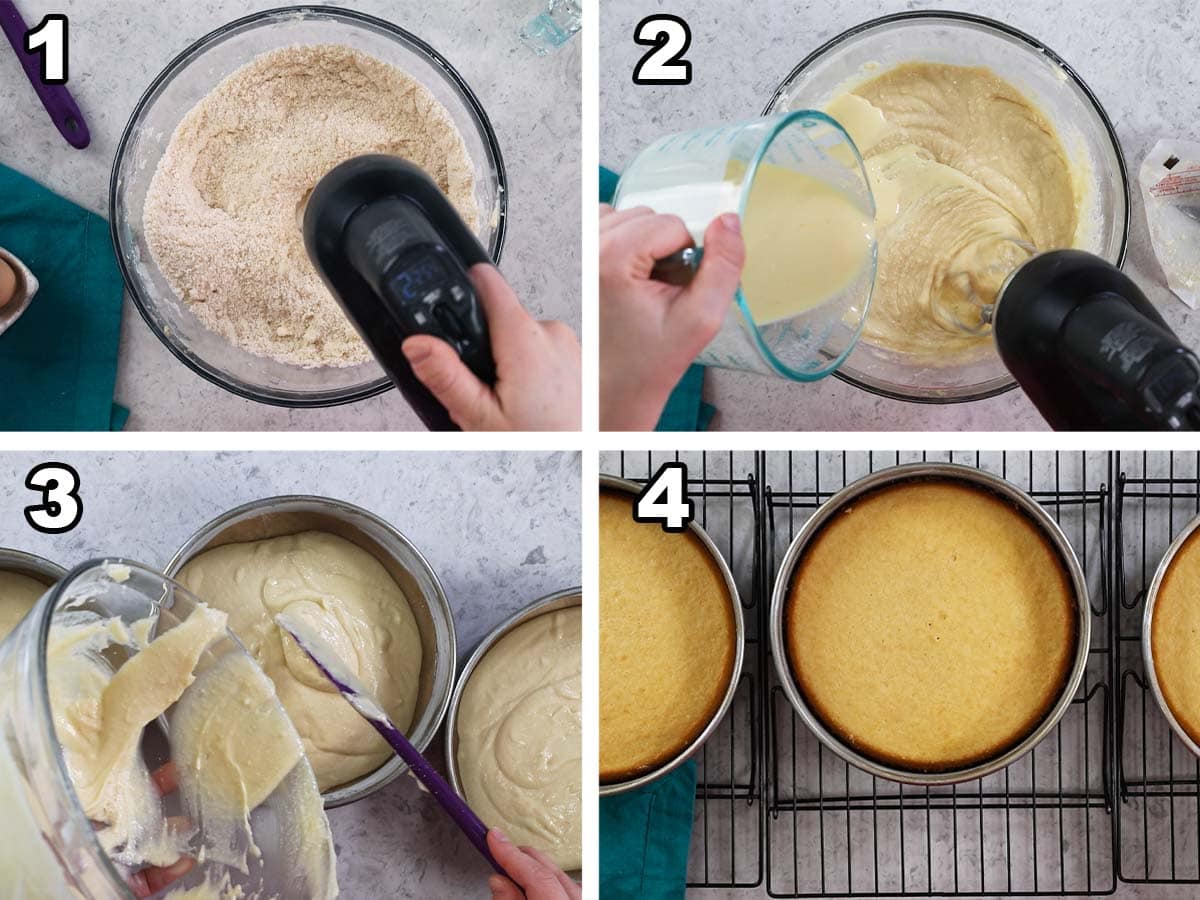
- Whisk together the dry ingredients and sugars, then start adding your butter one tablespoon at a time. Mix until each tablespoon is fully incorporated, then add the next. When you are done, this mixture will be a dry and sandy-looking.
- Gradually pour in your wet ingredients and stir until the batter is smooth and silky.
- Divide your batter between your cake pans and bake until a toothpick inserted in the center comes out clean or with moist crumbs. If your oven only fits two pans on the center rack, you can leave the third pan on your counter (or just leave the batter in the bowl, if you only have two pans) while the other two bake.
- Let the cakes cool for 10-15 minutes, then invert onto cooling racks to cool completely.
SAM’S TIP: Always prep your cake pans! Grease, flour, and line them with parchment rounds so there is NO chance of your cannoli cake layers sticking to the pans.
Make the Frosting
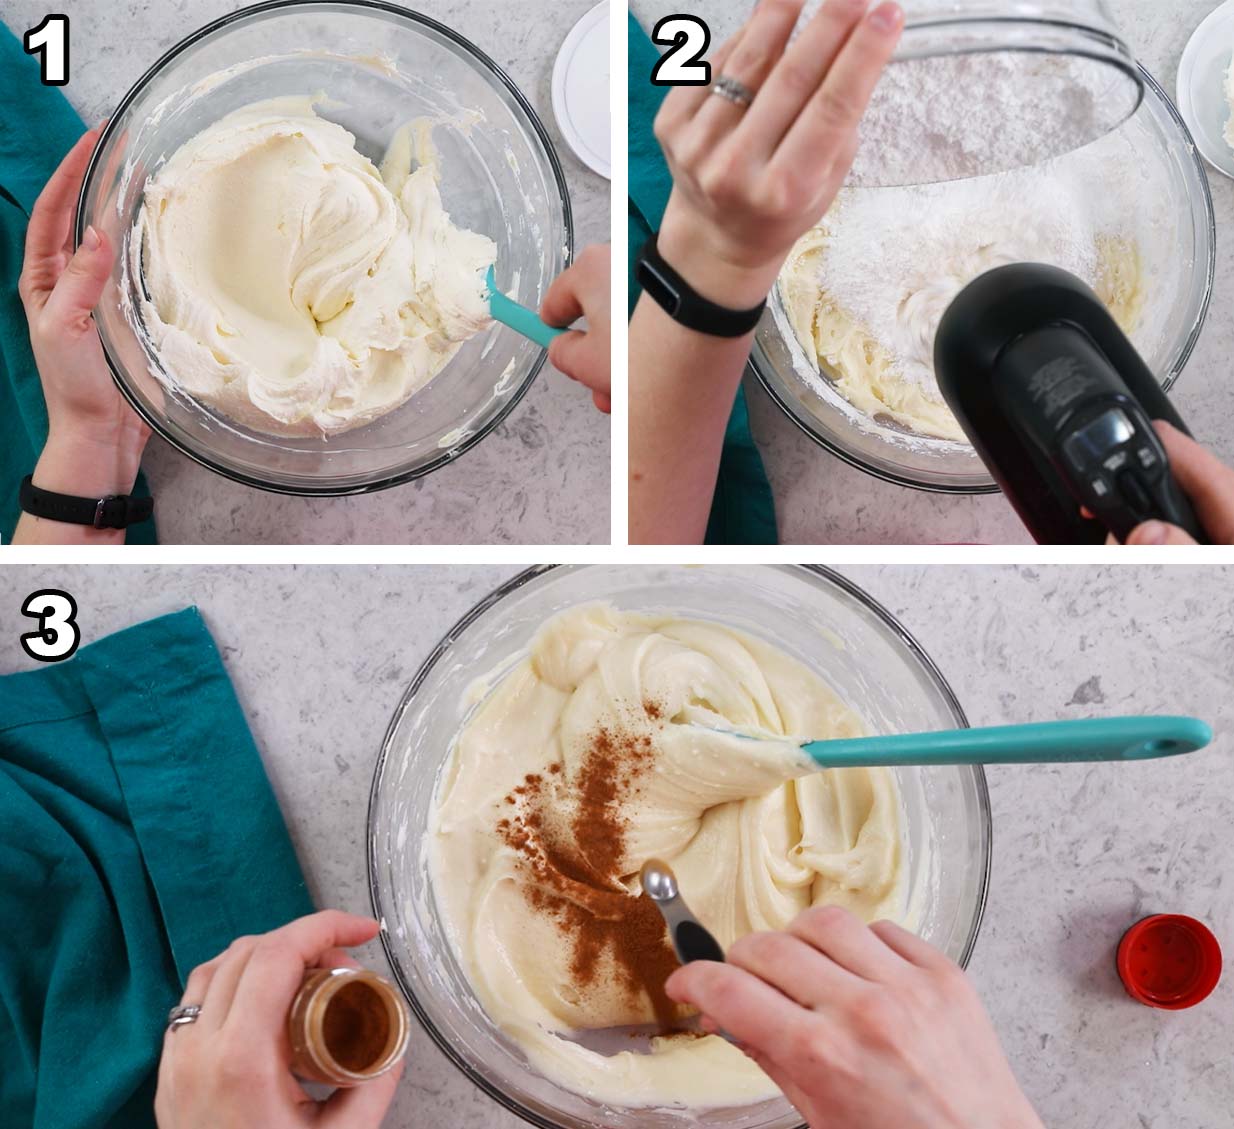
- Stir together the strained ricotta and mascarpone until smooth. Stick with low speed and mix until just combined; the mascarpone can break if handled too much.
- Add the sugar gradually, stirring until just combined and smooth.
- Stir in the cinnamon, vanilla, and salt, then you’re ready to decorate!
Assembly
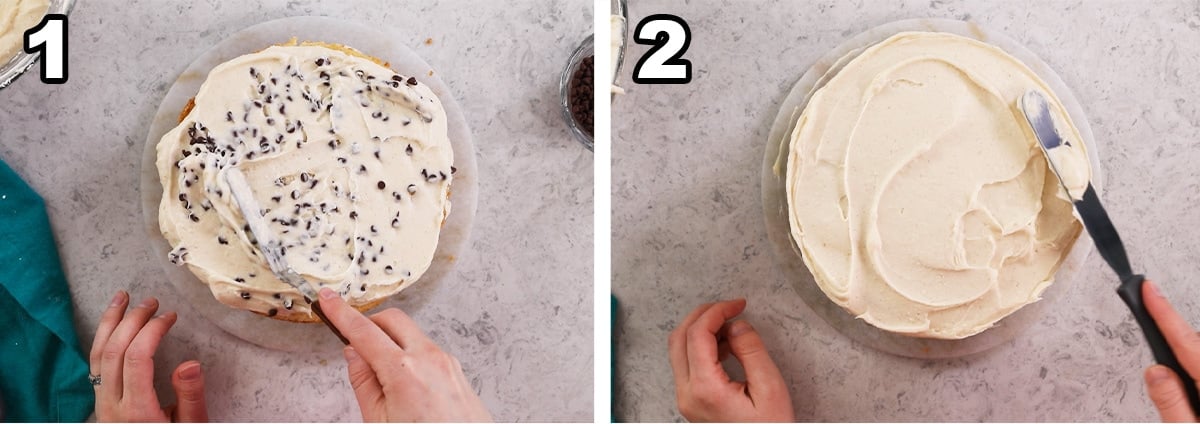
- Add a thick layer of frosting over your first cake layer, then top with mini chocolate chips. Repeat with your next cake layer, then add the final layer.
- Cover the entire cake with frosting and decorate as you wish. I like to press mini chocolate chips up the sides and around the top of my cannoli cake!
SAM’S TIP: Because this frosting is so soft, I really recommend doing a crumb coat before adding your final layer of frosting. It will make decorating the cake so much easier! If you haven’t done one before, I discuss this in my post on how to decorate a cake.
Frequently Asked Questions
Definitely! The ricotta and mascarpone in the frosting absolutely need to be refrigerated. Since the fridge can dry out cakes, make sure to store your cannoli cake in an airtight container to help it retain as much moisture as possible.
Yes! Your bake time will probably be closer to 17-18 minutes though. Note that this frosting doesn’t pipe very well since it is so soft, so some soft swirls are about as intricate as you will get here.
Yes! 9″ pans would work just fine for this cannoli cake recipe, or you can use a 9×13″ pan. Just note that your bake time will be different if you change the pan (9″ pans will bake faster), so stay close to your oven and keep an eye on your cakes!
I’ve been on a bit of a cake kick lately–just wait until you see my next one 🌴
Enjoy!
Let’s bake together! Subscribe to my newsletter to be notified of all the newest recipes, and find my free recipe tutorials on YouTube 💜
Cannoli Cake
Print
Pin
Rate
Servings: 14 servings
Calories: 700kcal
Prevent your screen from going dark
Instructions
Strain the ricotta
-
Line a large strainer with two layers of cheesecloth, place the ricotta cheese on top and wrap the cheesecloth around the ricotta. Place something heavy over the cheesecloth and press firmly to help squeeze out the liquid. Place the strainer in a mixing bowl that leaves at least an inch of space between the bottom of the strainer and the bottom of the bowl. Place in the refrigerator and allow the ricotta to strain at least 4 hours or overnight.
16 oz (454 g) whole milk ricotta cheese
Prepare the cake layers
-
Preheat oven to 350F (175C) and thoroughly grease and flour your cake pans. I recommend lining the bottoms of your cake pans with parchment paper rounds. Set aside.
-
In a large bowl or the bowl of your stand mixer, combine flour, sugars, baking soda, baking powder, and salt.
2 ⅔ cups (333 g) all-purpose flour, 1 ½ cups (300 g) granulated sugar, ½ cup (100 g) light brown sugar, 1 teaspoon baking powder, ½ teaspoon baking soda, 1 teaspoon table salt
-
With an electric mixer on low speed, or your stand mixer, add butter one tablespoon at a time, waiting for each tablespoon to be fully incorporated before adding the next. Once finished the mixture should have a slightly sandy texture.
12 Tablespoons (170 g) unsalted butter
-
In a separate bowl whisk together buttermilk, eggs, and vanilla extract until combined.
1 ½ cups (355 ml) buttermilk, 2 large eggs, 1 Tablespoon vanilla extract
-
With mixer on low speed, slowly pour buttermilk mixture into batter until combined and batter is smooth and silky. Be sure to pause and scrape the sides and bottom of the bowl as needed while mixing.
-
Evenly divide the batter into the prepared cake pans and bake in preheated oven for 28-30 minutes.When cakes are finished baking, a toothpick inserted into the center should come out clean or with only a few moist crumbs.
-
Allow cakes to cool in pan for 10-15 minutes in pan before running a knife along the edge to loosen them up and inverting onto a cooling rack. Cool completely before frosting.
Frosting
-
Remove ricotta and mascarpone from the refrigerator 15-20 minutes before beginning so they have some time to soften but do not become too warm.
16 oz (454 g) mascarpone cheese
-
Combine drained ricotta and mascarpone cheese in a large mixing bowl and use an electric mixer on low speed to stir until smooth.
-
Gradually add powdered sugar until combined and smooth.
4 cups (500 g) powdered sugar
-
Add vanilla, cinamon, and salt and stir to combine.
1 Tablespoon vanilla extract, ½ teaspoon ground cinnamon, ¼ teaspoon table salt
Assembly
-
If necessary, level your cooled cakes. Spread an even, moderately thick layer of frosting over the first cake layer. Sprinkle 2-4 Tablespoons of mini chocolate chips evenly over the frosting. Take your next layer of cake and repeat this process. Top with the last layer of cake and cover the entire top and sides of the cake with an even layer of the remaining frosting (see decorating note below). Press the remaining mini chocolate chips about ⅓ of the way up from the bottom of the cake, and sprinkle some on top, if desired.
¾ cups mini chocolate chips
Notes
Decorating tip
This is a soft frosting. If needed, do a light crumb coating around the entire cake and place in the freezer for 20-30 minutes before applying another layer of frosting. While the cake is in the freezer, be sure to keep the frosting covered and chilling in the refrigerator.
Storing
Store in an airtight container in the refrigerator for up to 5 days.
Nutrition
Serving: 1serving | Calories: 700kcal | Carbohydrates: 91g | Protein: 11g | Fat: 33g | Saturated Fat: 20g | Polyunsaturated Fat: 1g | Monounsaturated Fat: 4g | Trans Fat: 0.4g | Cholesterol: 102mg | Sodium: 362mg | Potassium: 120mg | Fiber: 1g | Sugar: 70g | Vitamin A: 996IU | Vitamin C: 0.1mg | Calcium: 192mg | Iron: 2mg
Nutritional information is based on third-party calculations and should be considered an estimate only. Actual nutritional content will vary based upon brands used, measuring methods, cooking method, portion sizes, and more.
Related Recipes