

This 100% from-scratch lemon cream cheese pie is sweet, tart, and perfect for summer! My recipe skips the store-bought Cool Whip and gelatin while still keeping things simple with minimal baking (only the crust!). Recipe includes a how-to video!
Why This Recipe WORKS
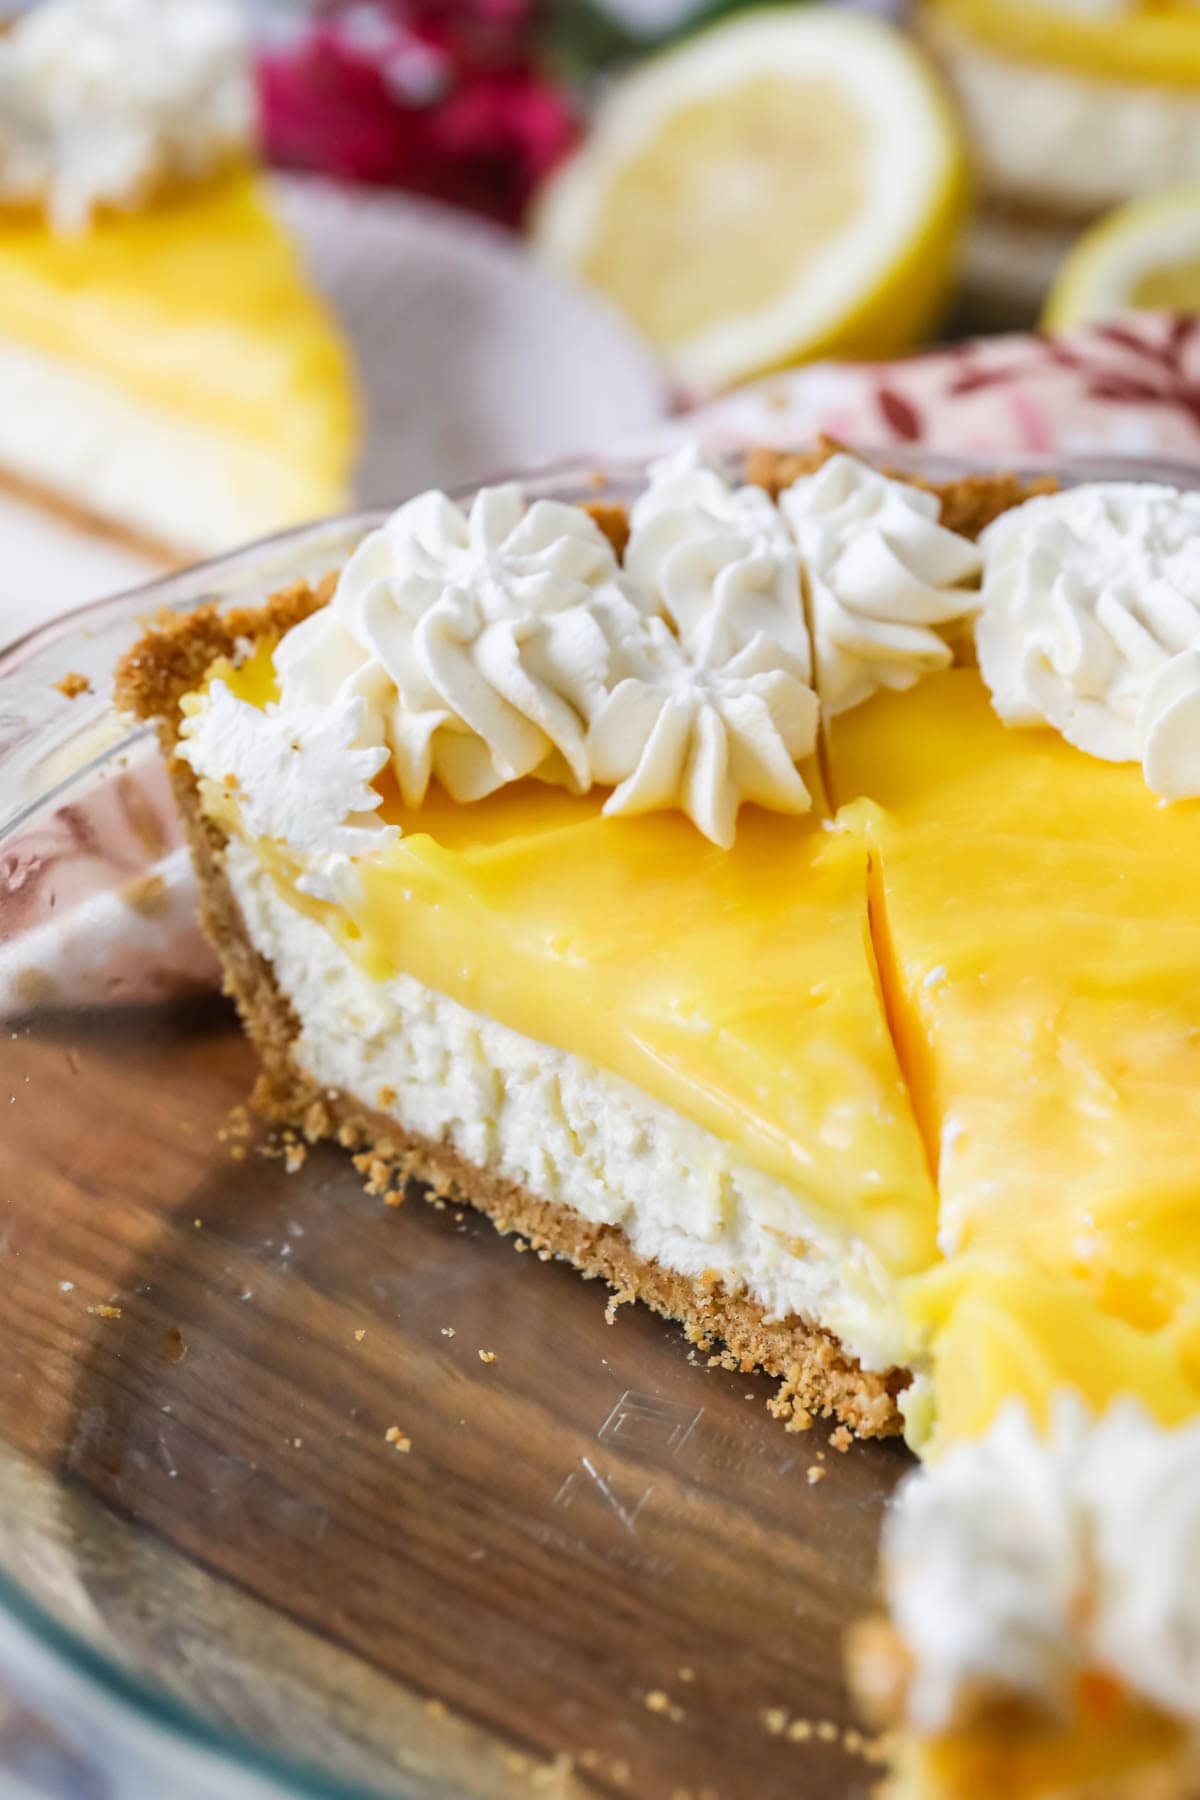
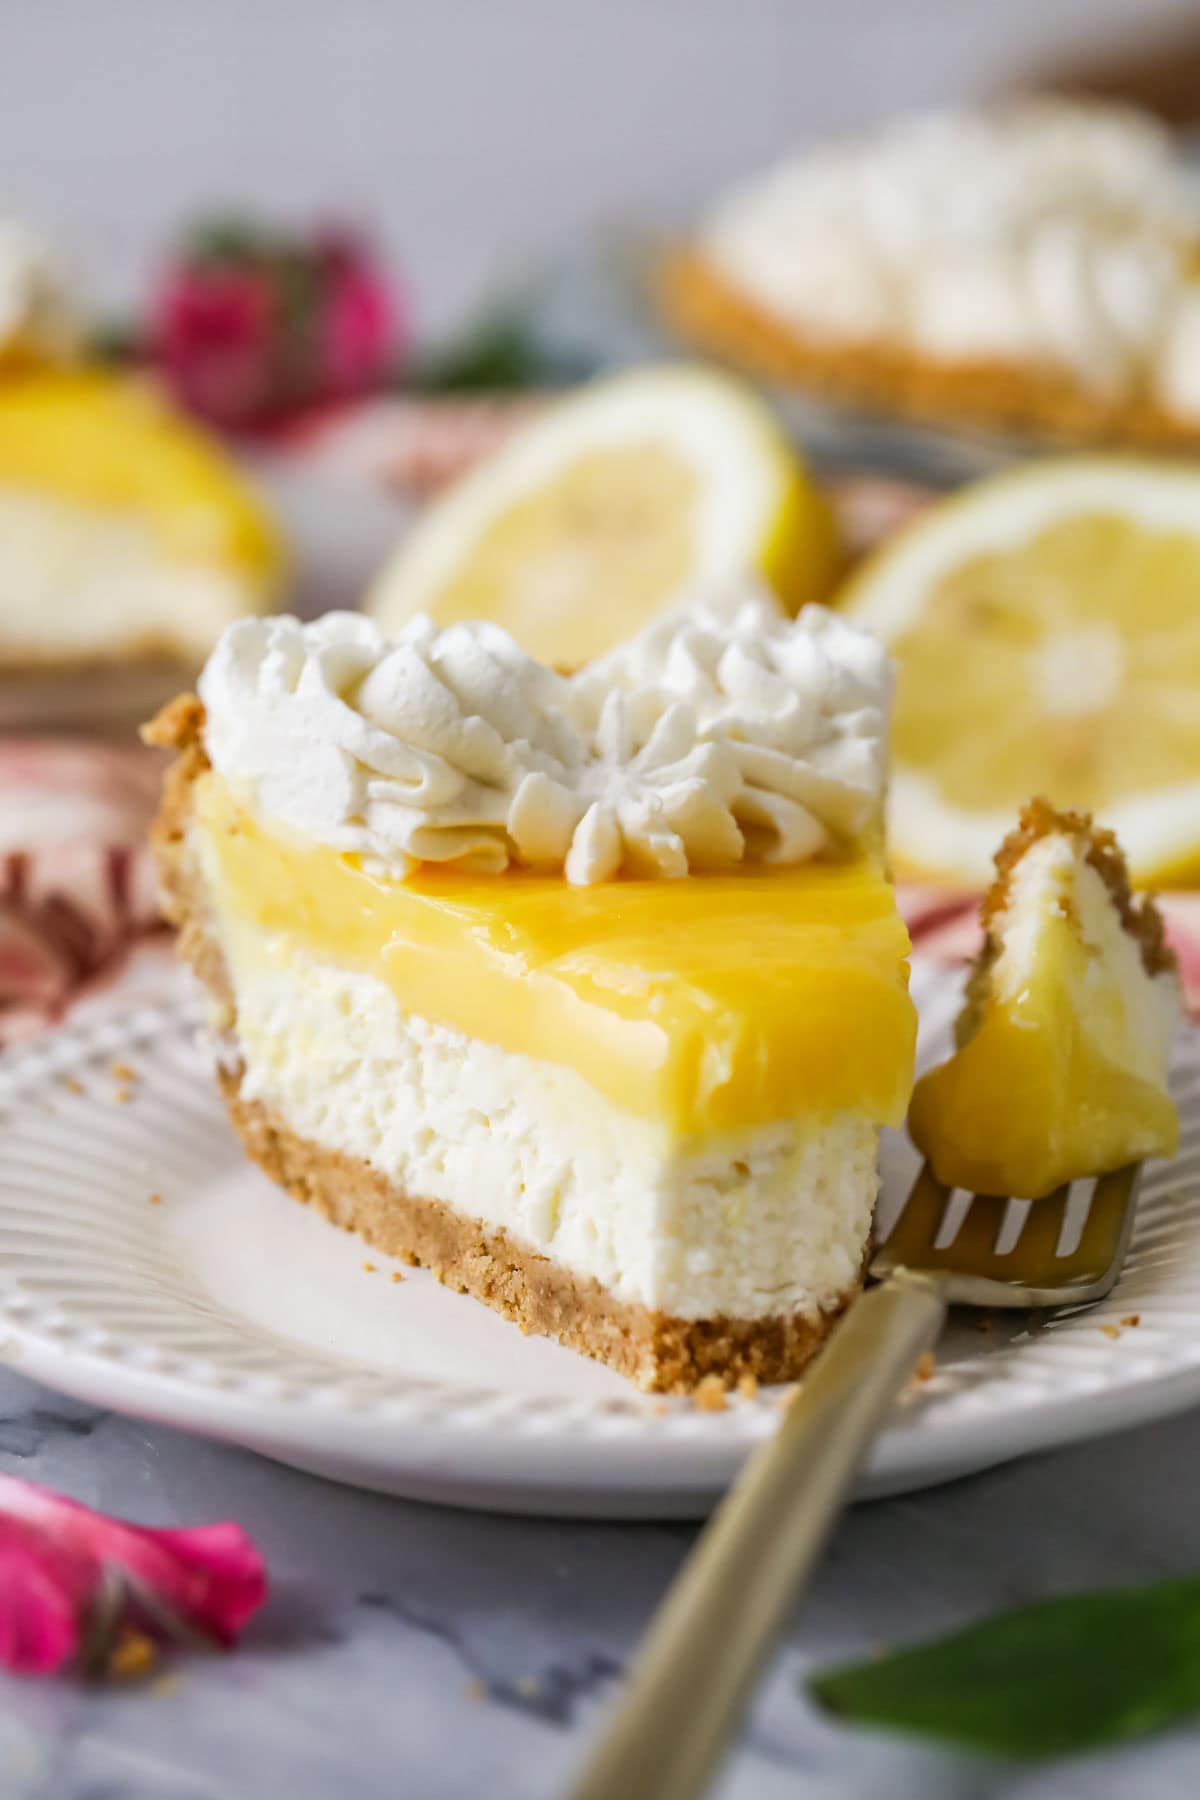
- Balanced flavors: Every layer of this lemon cream cheese pie is important! The buttery salted graham cracker crust is the perfect firm base, and the smooth, tart lemon curd contrasts beautifully with the creamy filling.
- 100% from-scratch: Not only does this method provide the best taste and texture, but it also gives us complete control over what goes into our pie. You won’t find any artificial flavors or colors, hydrogenated oils, or high fructose corn syrup in my recipe like you would in one made with Cool Whip or gelatin.
- Make-ahead friendly, since the pie needs to chill for several hours before slicing. After a stint in the fridge, it sets up beautifully and slices like a dream!
- Plenty of helpful and important tips throughout including selecting a non-reactive pan for your lemon layer, pressing the filling evenly against the crust, and zesting your lemons before juicing them.
Creamy, tart, and so refreshing, today’s lemon cream cheese pie is what summer dessert dreams are made of! This one came highly requested over on my YouTube channel, so I got to work. The final product consists of a crisp, crumbly graham cracker crust topped with a smooth cream cheese layer and a sweet-tart lemon topping. Think of it like the sister recipe to my strawberry cream cheese pie and blueberry cream cheese pie!
Jump to:
Ingredients
Before we begin, I’ll review a few of the key ingredients in this recipe. If you’re ready to get started, keep scrolling!
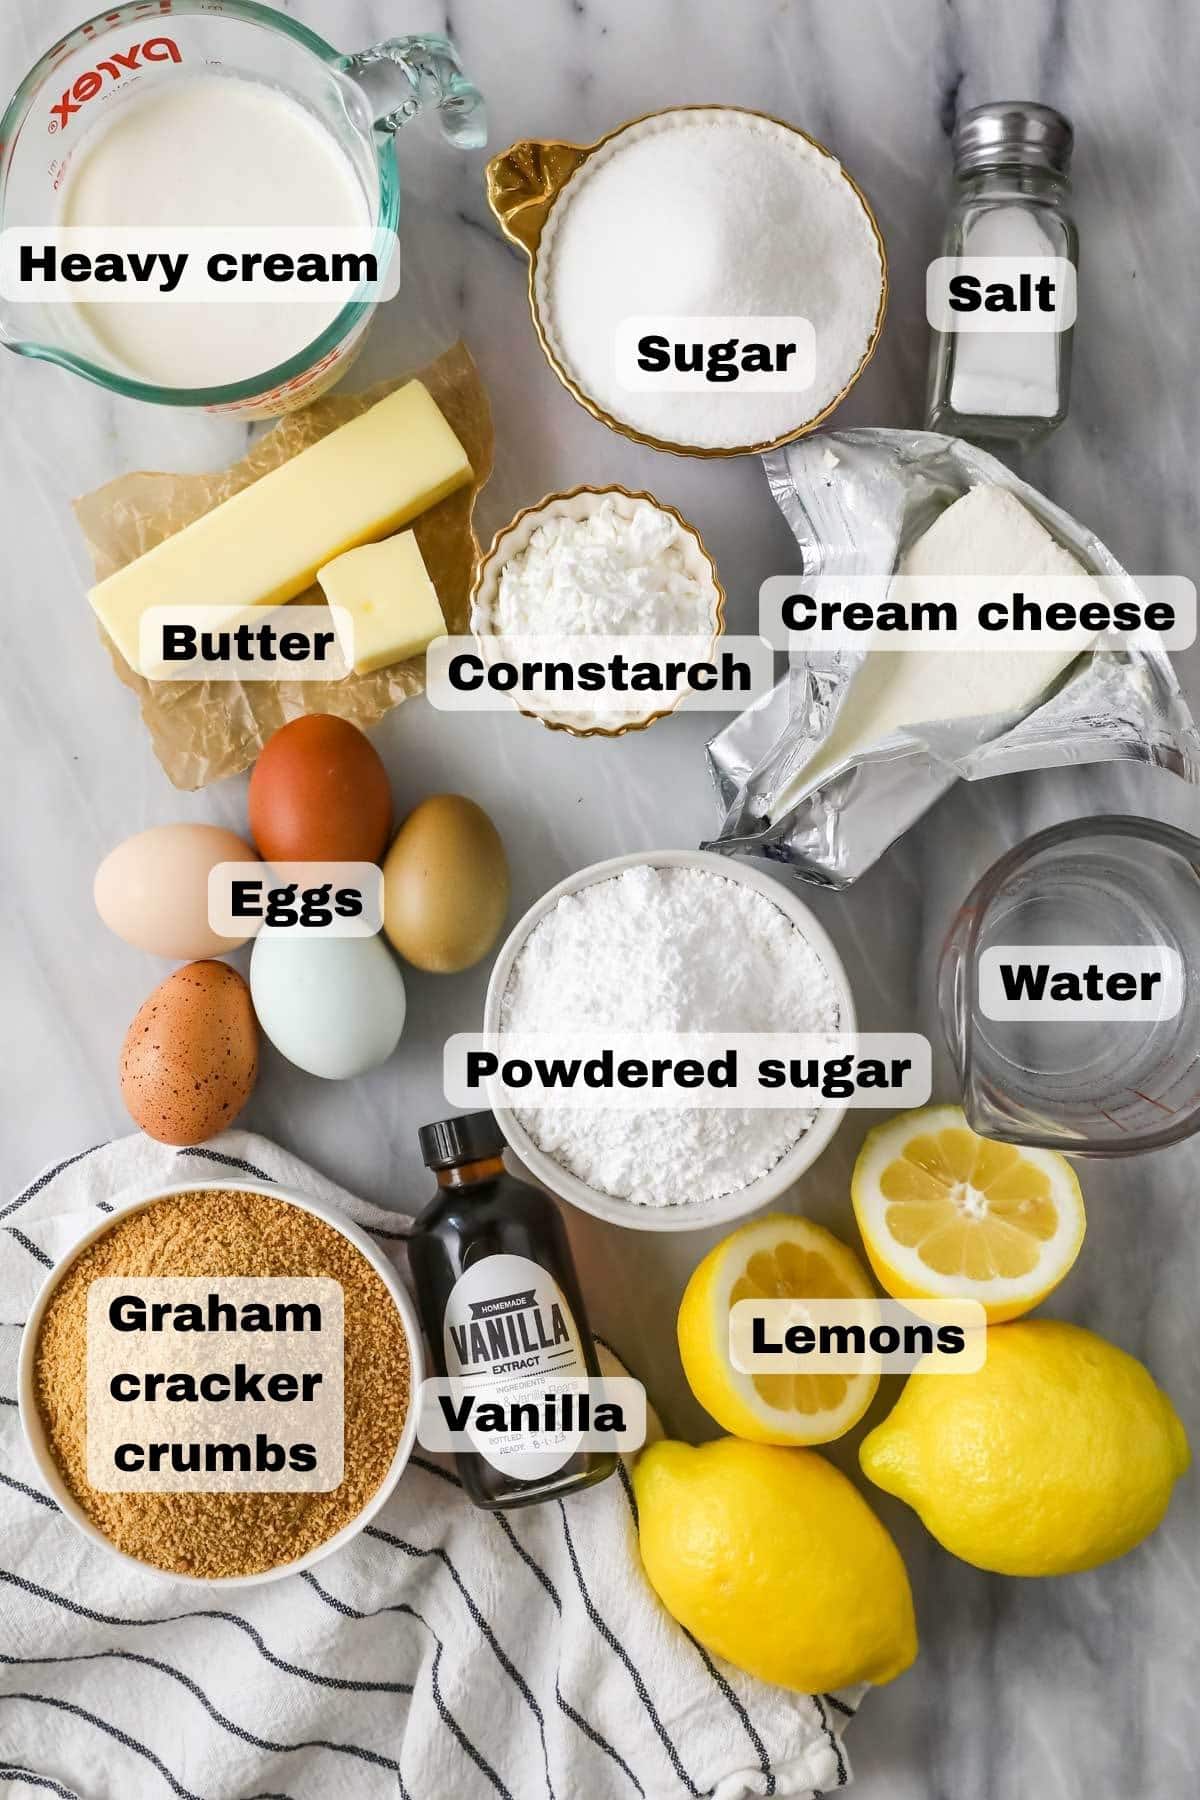
- Lemons. Fresh lemon juice is better by far than bottled, plus you’ll need fresh lemons for the zest anyway! I highly recommend zesting your lemons before juicing; it’s too tricky the other way around.
- Egg yolks. These (along with some cornstarch)are essential for giving the lemon topping a custardy but sliceable texture. If you don’t want to waste your egg whites, repurpose them to make coconut cake, meringue cookies, angel food cupcakes, or pavlova. Ooh, or macarons!
- Cream cheese. Use brick-style, full-fat cream cheese. Tub-style or reduced fat cream cheese will be too soft, and your pie won’t set up properly.
- Heavy cream. Double cream or whipping cream will also work. While you should soften your cream cheese, the cream needs to be nice and cold, otherwise you could run into issues when whipping.
- Graham cracker crumbs. We’ll combine these with some sugar and melted butter (I recommend salted butter here!) to make our crust. Pulverized digestive biscuits will also work. I haven’t tried it, but I suspect gingersnaps or vanilla wafers would be tasty here too!
This is just an overview of the ingredients I used and why. For the full recipe please scroll down to the bottom of the post!
SAM’S TIP: It’s extremely important that you use a non-reactive saucepan (stainless steel, enameled cast iron, ceramic, etc) when making the lemon layer. If you don’t, your lemon layer will taste metallic and it will ruin your pie.
How to Make Lemon Cream Cheese Pie
Step 1: Make the crust
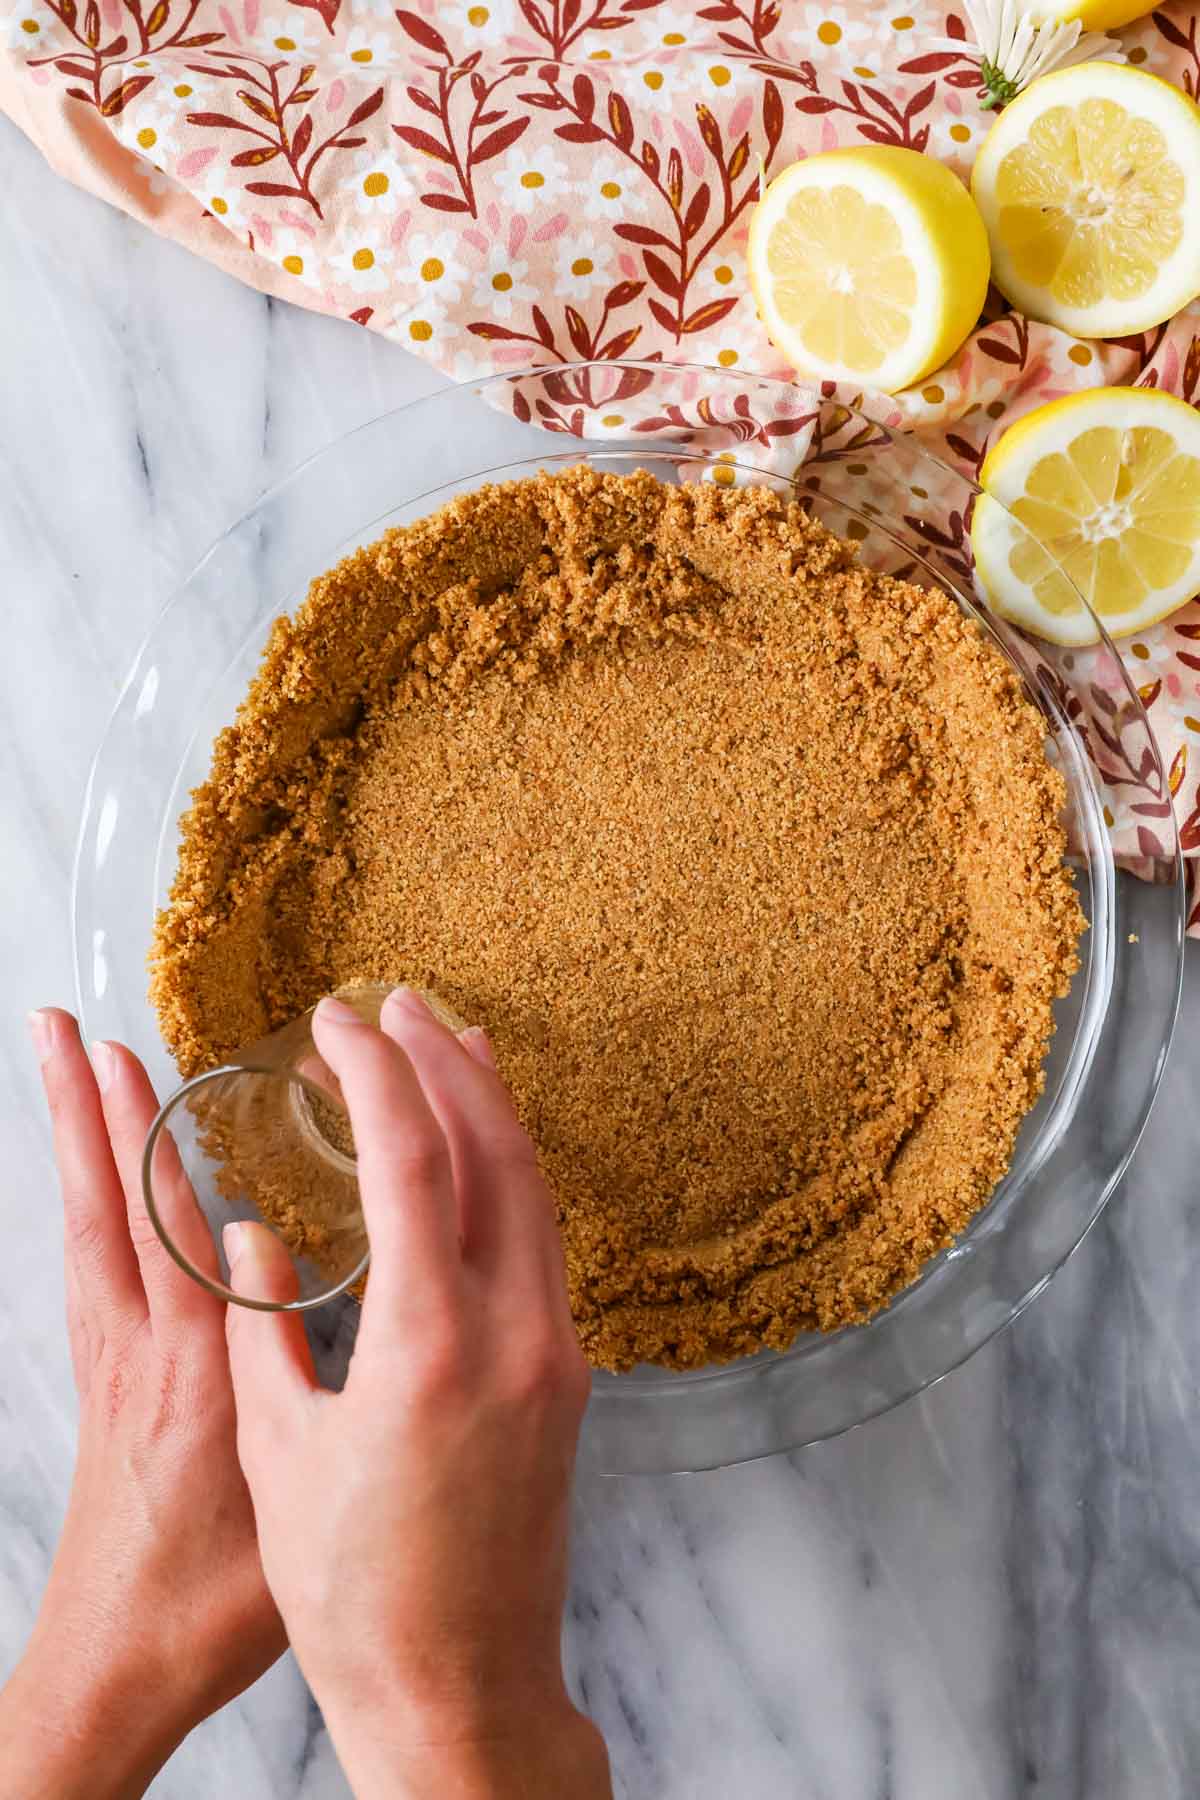
This is a simple crust I’ve been using for years. Just combine the graham cracker crumbs and sugar, then add the melted butter and stir until everything is evenly coated.
Evenly press into the bottom and up the sides of your pie plate, then bake until the edges start to turn golden brown (about 10 minutes). Easy peasy, right? Be sure to let this cool completely before you add your filling.
Step 2: Prep + cool the topping
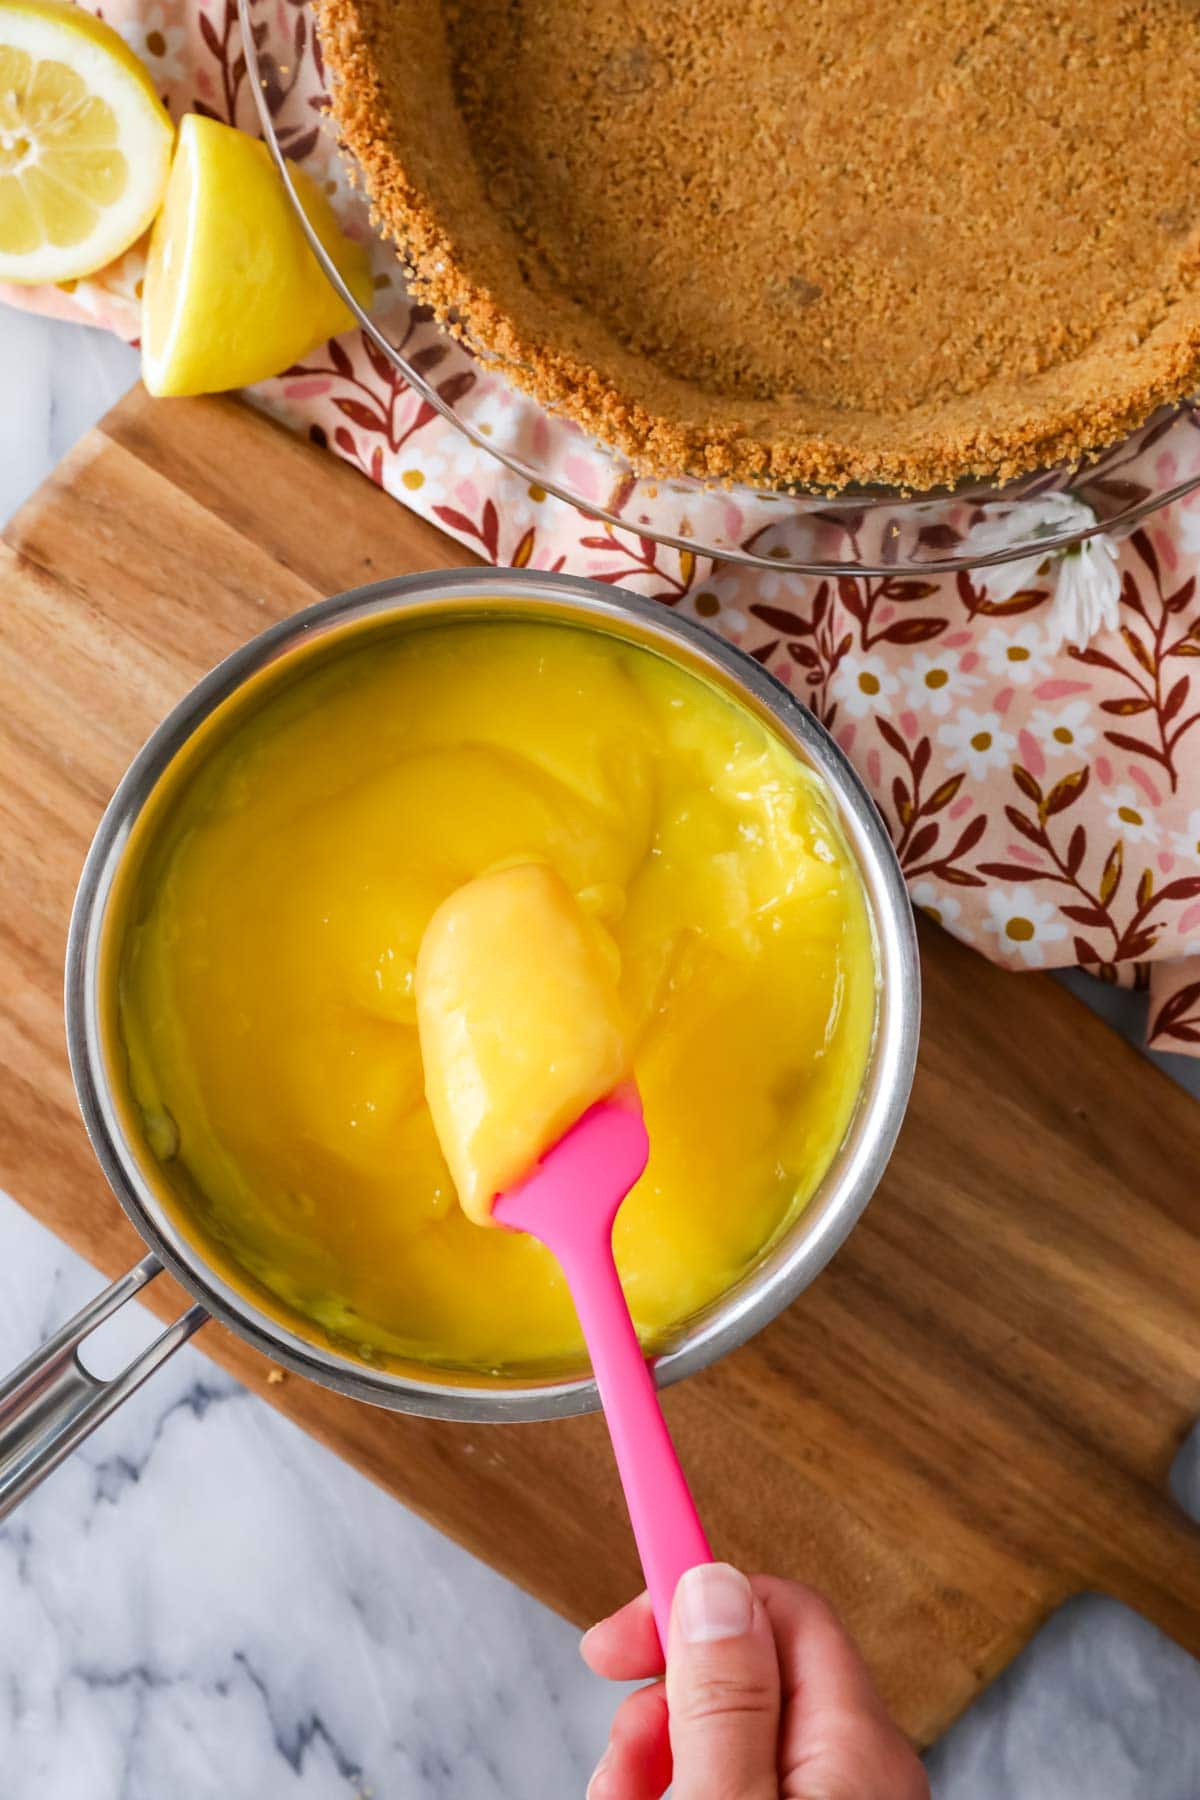
Since it also needs time to cool, we’ll make our lemon topping next. This comes together on the stove; think of it like a hybrid between a lemon curd and a lemon meringue pie filling.
Add the sugar, salt, and cornstarch and whisk these together until combined. Whisk the egg yolks, lemon zest, and lemon juice together in a separate bowl, then pour this into the cornstarch mixture. Whisk again until combined (some small lumps here are okay), then add the water.
Whisk over medium-low heat constantly until the mixture thickens to a pudding consistency. Your whisk will leave a trail and the mixture should coat the back of a spoon when it’s ready.
Pour this through a(nonreactive) fine mesh strainer to pour your curd through (to catch any bits of lemon zest or egg). Whisk in the butter a tablespoon at a time, then set the curd aside to cool.
Step 3: Make the filling
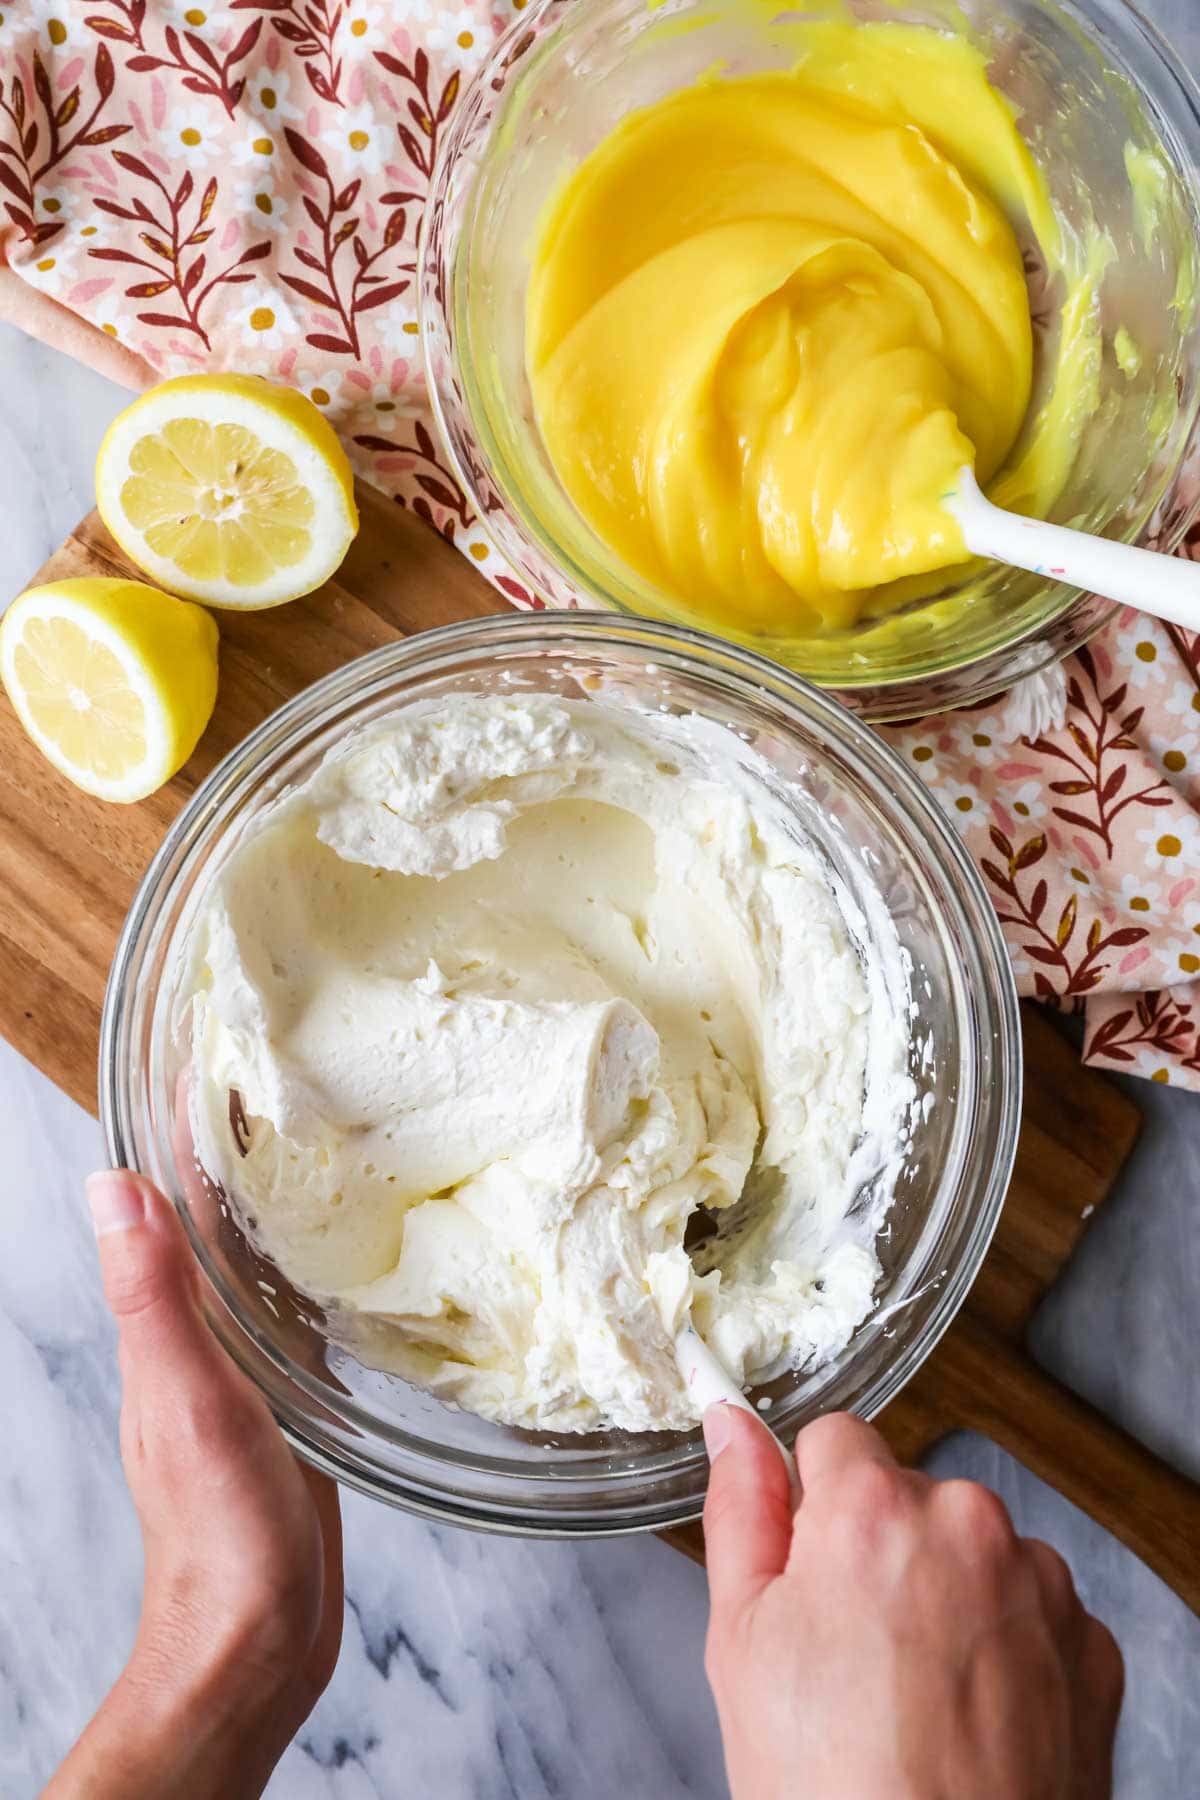
While the curd cools, prep your whipped cream cheese layer. This is similar to my no-bake cheesecake, if you’ve made that! Start by whipping half of the sugar with the heavy cream until you see thick and fluffy stiff peaks–think Cool Whip texture!
Add the remaining sugar to another bowl along with the cream cheese and vanilla. Beat this mixture until smooth and creamy (you can use the same beaters you used for the whipped cream).
Fold the whipped cream into the cream cheese until you have a uniform mixture. Add this into your crust, pressing the filling evenly against the entire crust–you don’t want any gaps.
Step 4: Assemble & chill
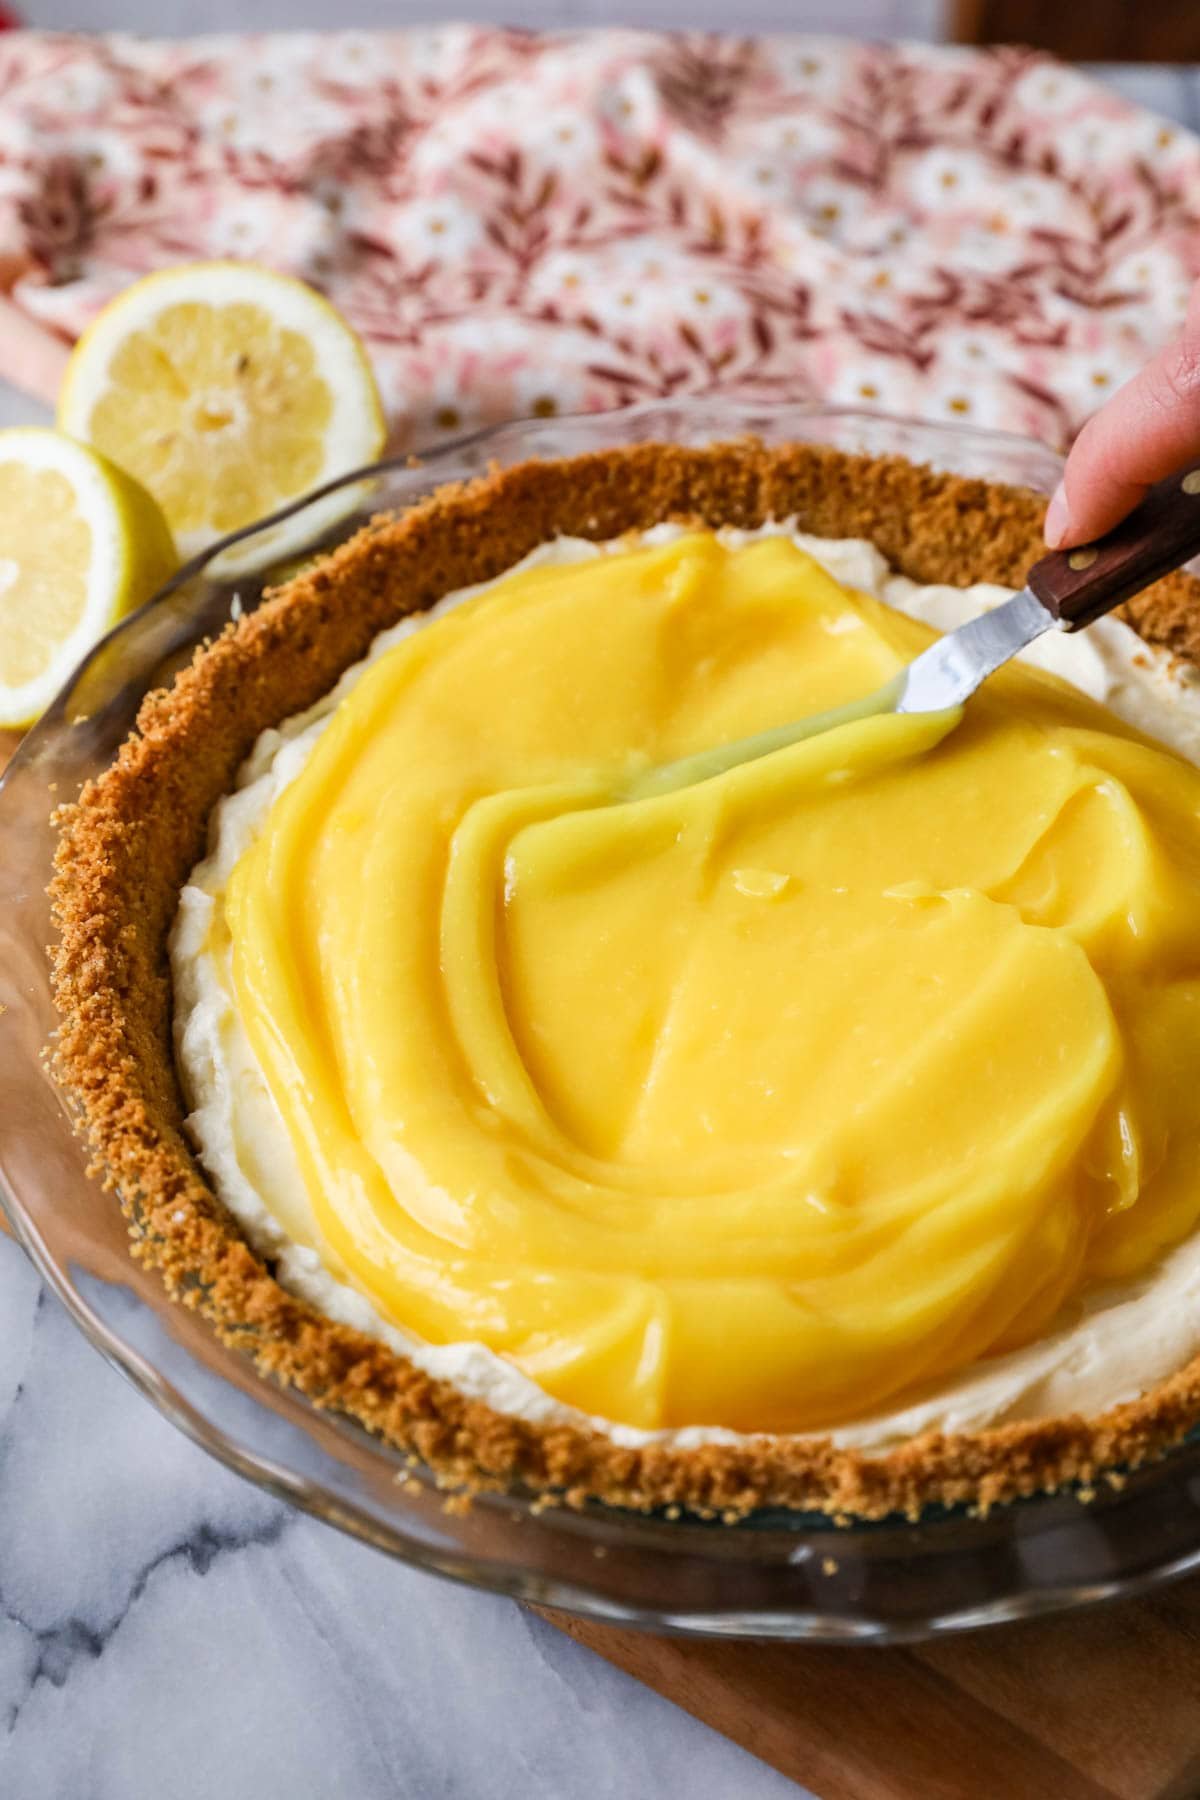
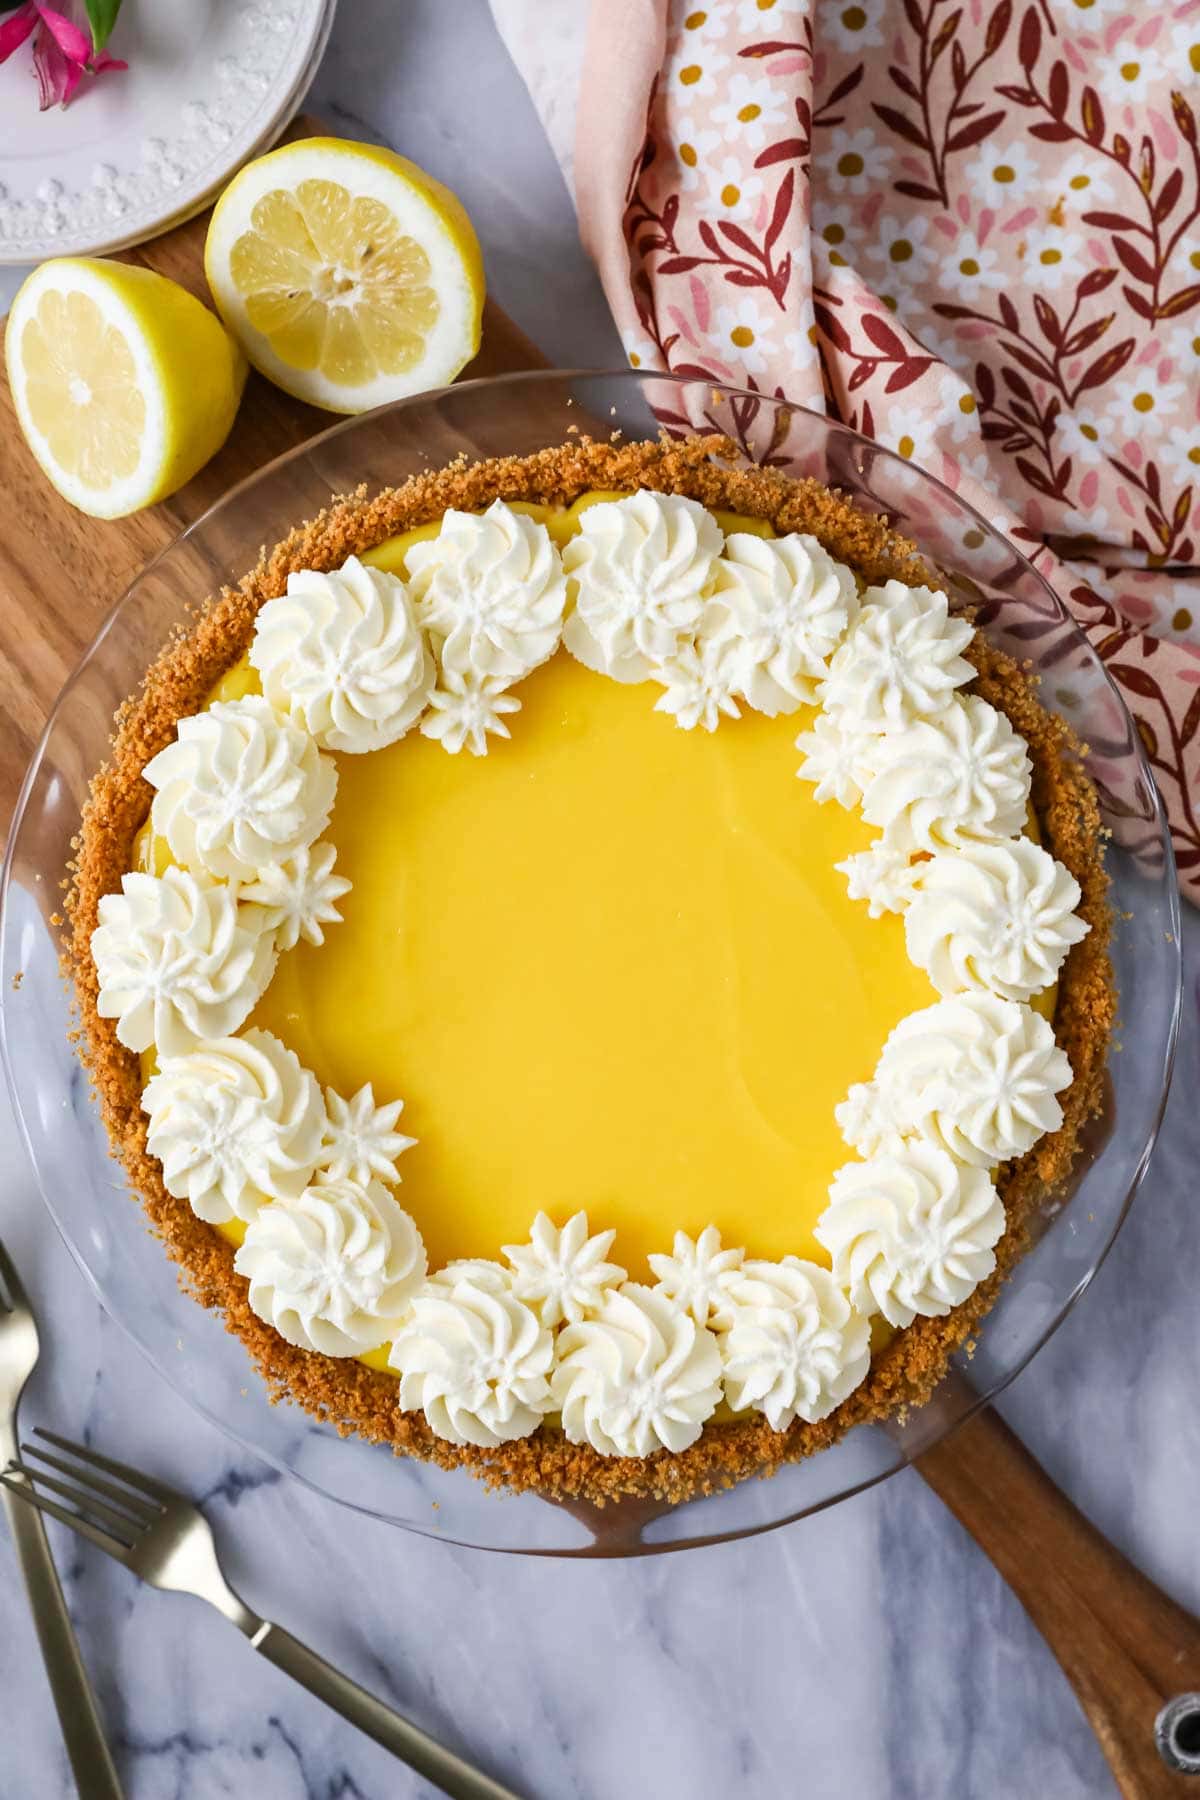
Once your lemon topping has cooled, spread that over the cream cheese layer. Pop the pie in the fridge to set up for at least 3 hours. Decorate with whipped cream if desired (an extra step, I know, but you really should), then slice and serve!
SAM’S TIP: Just before serving, I like to top this pie with a piped border of homemade whipped cream. It’s pretty, and the cream helps cut the tartness from the lemon (just like in my lemon pie or lemon tart!). You could always dollop the cream on top in the center of the pie if you don’t have a piping bag/tip.
Frequently Asked Questions
This recipe will make too much filling for your average foil-pan store-bought crust. I really recommend making a homemade crust as instructed in the recipe for the best flavor and texture, and so none of your filling goes to waste. It only takes seconds to mix together and the result is far better than anything that’s been sitting on a grocery store shelf!
If you used a reactive pan (like aluminum or non-enameled cast iron) when making your lemon filling or strained it through a reactive strainer, you could end up with a metallic tasting pie.
You can read more about reactive vs. nonreactive pans, but essentially the acid in the lemons react with the metal pan, resulting in that unpleasant flavor you’re tasting. Unfortunately you cannot salvage this after the fact, so you will need to start over with a non-reactive pan 🙁
I do not recommend it. Unfortunately tub-style cream cheeses have additives in them to keep them spreadable, and these can prevent your pie from setting up properly. I don’t recommend using tub-style cream cheese in any of my recipes, but especially in pie or cheesecake that need to set up properly to be sliceable.
More Favorite Lemon Recipes
Be sure to check out my comprehensive list of lemon recipes for even more recipes like this one 🍋 Enjoy!
Let’s bake together! Subscribe to my newsletter to be notified of all the newest recipes, and find my free recipe tutorials on YouTube 💜

Lemon Cream Cheese Pie
Print
Pin
Rate
Prevent your screen from going dark
Servings: 12 servings
Calories: 426kcal
Instructions
Prepare the crust:
-
Preheat oven to 350F (175C). In a medium-sized bowl, whisk together graham cracker crumbs and sugar. Drizzle in the melted butter and use a fork to toss together until all crumbs are moistened.
1 ½ cups (170 g) graham cracker crumbs, 3 Tablespoons granulated sugar, 7 Tablespoons (100 g) salted butter
-
Press crumbs evenly into the bottom and up the sides of a 9 ½” pie plate. Transfer to center rack of 350F (175C) oven and bake for 10-13 minutes, until edges are beginning to brown. Allow to cool completely while you prepare the topping and filling.
Prepare the lemon topping
-
Combine sugar, cornstarch, and salt in a nonreactive (not aluminum or non-enameled cast iron – use stainless steel, ceramic, enameled or glass) saucepan and whisk to combine.
1 cup (200 g) granulated sugar, ⅓ cup (43 g) cornstarch, ¼ teaspoon salt
-
Separately, whisk together egg yolks, lemon juice, and zest until combined.
½ cup (118 ml) fresh-squeezed lemon juice, 1 Tablespoon lemon zest, 5 large egg yolks
-
Add egg yolk mixture to the sugar mixture and whisk until well-combined.
-
Whisk in the water. Continue to whisk constantly over medium-low heat until mixture is thickened to a pudding-like consistency. Immediately remove from heat and pour through a fine mesh strainer into a medium-large heatproof mixing bowl.
¾ cup (177 ml) water
-
Whisk in the butter, one tablespoon at a time, until completely melted. Allow to cool before topping the pie; as it cools you can prepare the filling.
4 Tablespoons (56 g) salted butter
Prepare the cream cheese filling
-
Make the filling by combining cold heavy cream and about half of the powdered sugar (½ cup/62g) in a large mixing bowl. Use an electric mixer to beat on medium-low speed, then gradually increase speed to high and continue to whip until you’ve reached stiff peaks (mixture will be thick, fluffy, voluminous). Set aside.
1 cup (236 ml) heavy cream
-
In a separate mixing bowl, combine cream cheese, remaining ½ cup/62g powdered sugar, and vanilla extract and use electric mixer to stir until smooth, creamy, and lump free.
8 oz (226 g) cream cheese, ¾ teaspoon vanilla extract
-
Add the whipped cream mixture to the cream cheese and gently fold the two together until uniform and completely combined.
-
Layer cream cheese/whipped cream mixture into cooled crust, being sure it makes contact with the bottom of the crust all the way around (any pockets between the filling and the crust will create holes that crumble when you cut into the pie).
-
Top with cooled lemon mixture and spread into an even layer.
-
Transfer to refrigerator and chill for at least 3-4 hours before serving. If desired, top with half a batch of whipped cream before slicing and serving.
½ batch homemade whipped cream
Notes
Cover tightly and store in the refrigerator for up to 4 days.
Nutrition
Serving: 1serving | Calories: 426kcal | Carbohydrates: 44g | Protein: 4g | Fat: 27g | Saturated Fat: 16g | Polyunsaturated Fat: 1g | Monounsaturated Fat: 7g | Trans Fat: 0.4g | Cholesterol: 150mg | Sodium: 270mg | Potassium: 86mg | Fiber: 0.5g | Sugar: 33g | Vitamin A: 976IU | Vitamin C: 5mg | Calcium: 55mg | Iron: 1mg
Nutritional information is based on third-party calculations and should be considered an estimate only. Actual nutritional content will vary based upon brands used, measuring methods, cooking method, portion sizes, and more.