One jar of Biscoff is enough. No need to buy extra – half goes into the cream, half becomes the topping. You’re all set.
You got this!
One jar of Biscoff is enough. No need to buy extra – half goes into the cream, half becomes the topping. You’re all set.
You got this!
I’ve tested several versions of this cake. Here’s what I learned:

This dessert is rich. I usually serve it after lighter meals or pair it with something that balances the sweetness.

Did you make this? If you snap a photo, please be sure tag us on Instagram at @panlasangpinoy or hashtag #panlasangpinoy so we can see your creations!
This Biscoff Icebox Cake is a creamy, no-bake dessert with layers of Lotus Biscoff cookies and cookie butter cream. Only 4 ingredients needed – perfect for parties and make-ahead desserts.
1 Electric mixer or stand mixer For whipping cream to soft peaks
1 9×9 inch baking pan Use 8×8 for thicker layers or 9×13 for more servings
1 Large mixing bowl For whipping cream
1 Microwave-safe bowl For melting Biscoff spread
1 Plastic wrap Optional, for lining pan and easier removal
Crush 6 Biscoff cookies into small pieces. Set aside for cream mixture and topping.
40 pieces Lotus Biscoff Cookies
Pour cold cream into a large mixing bowl. Whip with electric mixer until soft peaks form, about 4-5 minutes.
500 ml Nestle All-Purpose Cream
Add 5 tablespoons Biscoff spread (warm 10 seconds in microwave first), all condensed milk, and 2/3 of crushed cookies. Mix until combined.
8 oz Carnation Condensed Milk, 13.4 oz Biscoff Spread
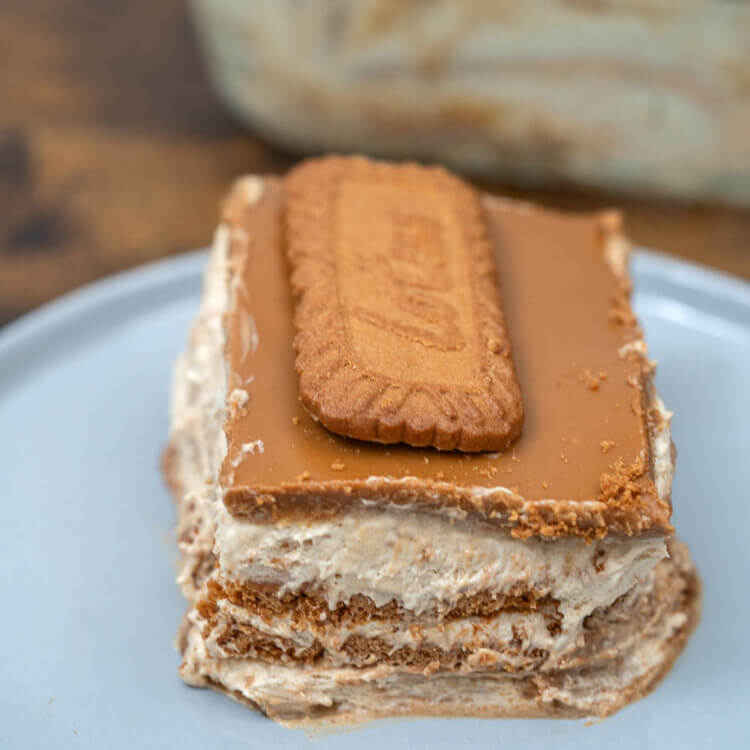
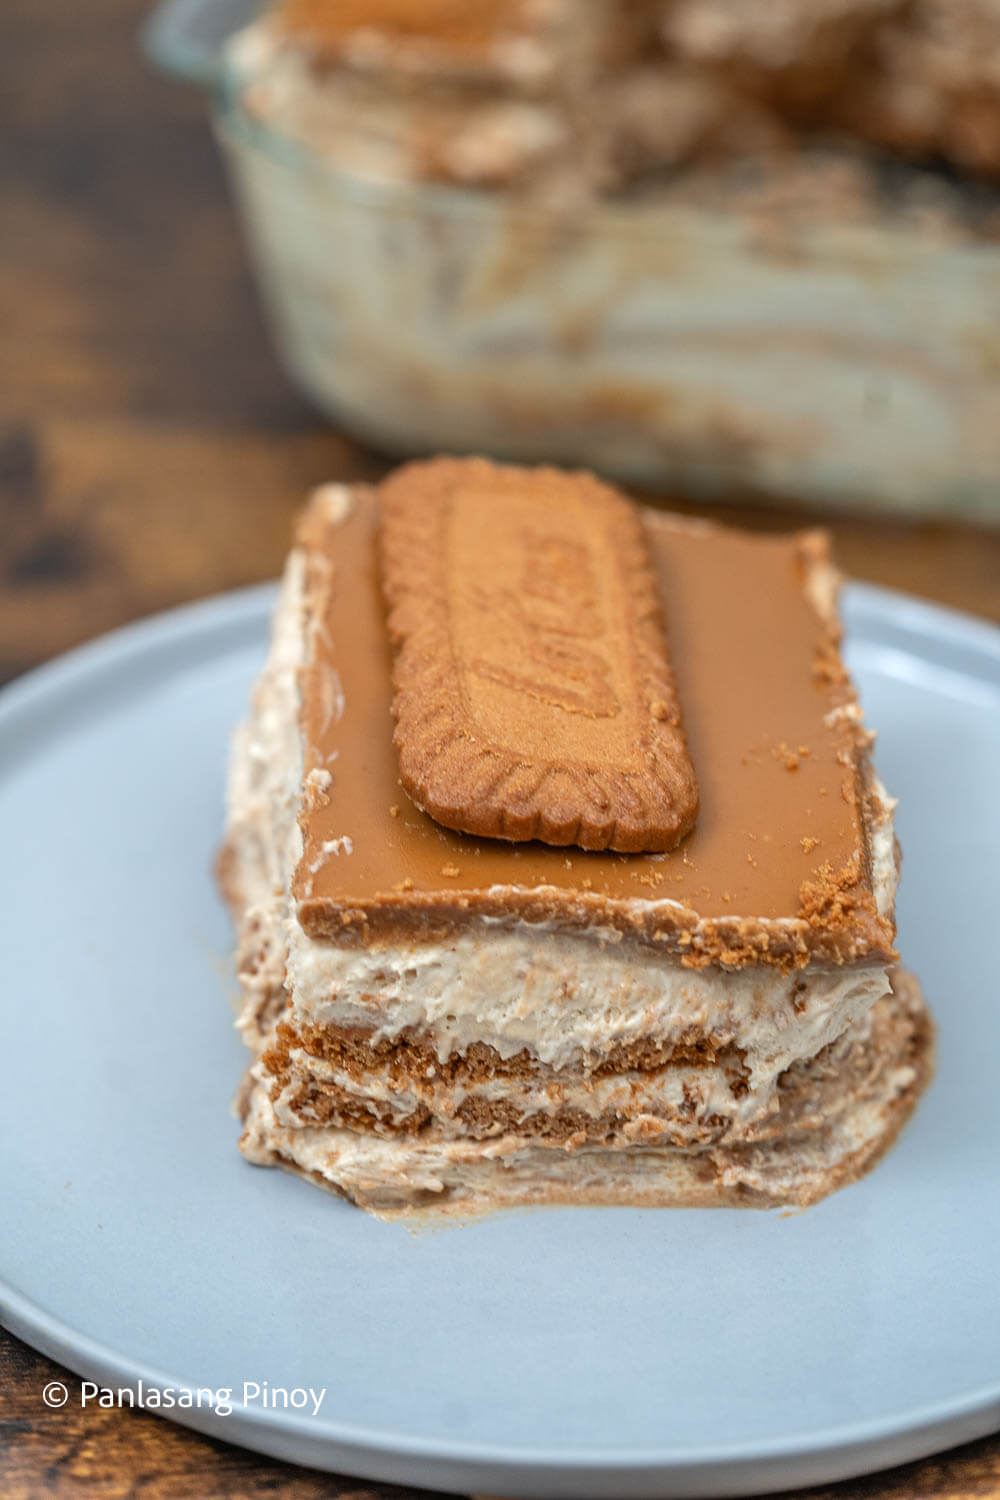
In a 9×9 inch pan, arrange Biscoff cookies in a single layer. Spread cream mixture on top. Repeat layers, ending with cream on top.
Cover and freeze for 2-3 hours until firm.
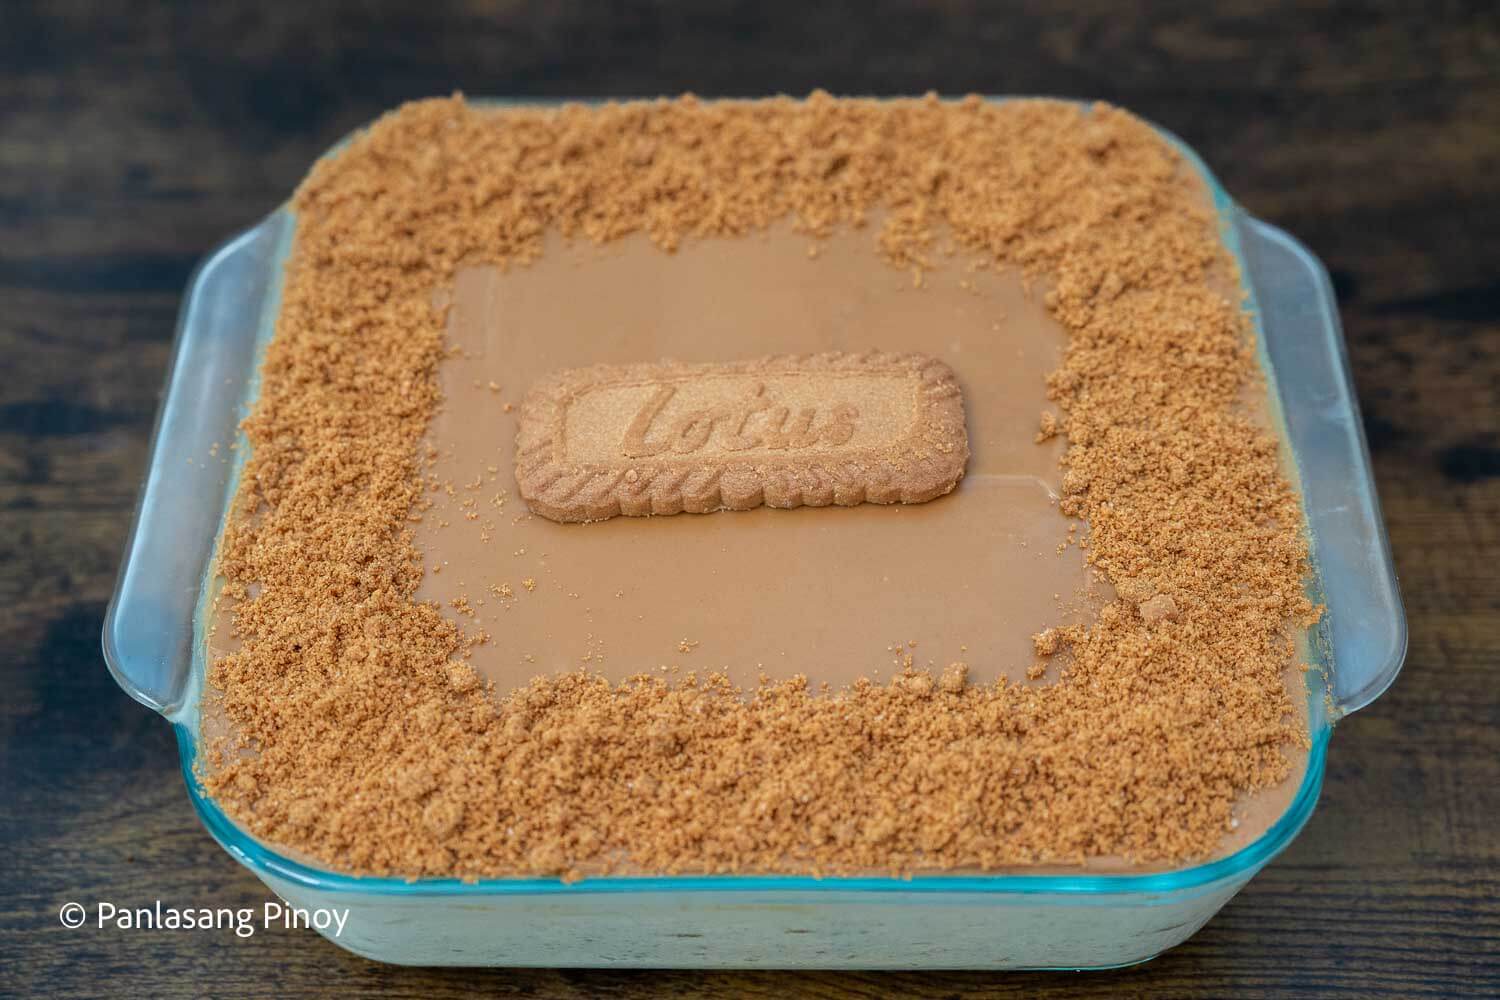
Microwave remaining Biscoff spread for 30 seconds until pourable. Pour over frozen cake and spread to edges. Sprinkle remaining crushed cookies on top.
Refrigerate for 1 hour until topping sets. Slice and serve cold.
Calories: 413kcal (21%) Carbohydrates: 30g (10%) Protein: 5g (10%) Fat: 31g (48%) Saturated Fat: 14g (70%) Polyunsaturated Fat: 1g Monounsaturated Fat: 4g Cholesterol: 54mg (18%) Sodium: 35mg (1%) Potassium: 110mg (3%) Sugar: 23g (26%) Vitamin A: 667IU (13%) Vitamin C: 1mg (1%) Calcium: 81mg (8%) Iron: 0.1mg (1%)
Freeze for at least 2-3 hours, then refrigerate for 1 hour after adding the topping. For best results – soft cookie layers and clean slices – chill overnight.
They need more time to absorb moisture from the cream. Refrigerate for at least 4-6 hours, or overnight. The cookies should soften into a cake-like texture. If they’re still crunchy, give it more time.
Can I make this without freezing?
You can, but the cake will be softer and harder to slice neatly. Freezing firms it up so you get clean squares. If skipping the freezer, refrigerate for at least 6 hours.
Check the peanut butter aisle or international section at SM Supermarket, Robinsons, or Landmark. It’s also available on Lazada and Shopee. Look for the brown jar with the red lid labeled “Lotus Biscoff” or “Cookie Butter.”
The crunchy version doesn’t melt as smoothly for the topping. If you use it in the cream, it works fine – you’ll just have more texture. For the drizzle on top, creamy melts better.
About 30 minutes at room temperature. After that, it starts to soften too much. Keep it refrigerated and only take out slices as needed. It’s best served cold.

Layers of graham crackers with cream and canned fruit cocktail. Easy party dessert.

Rich chocolate filling in an Oreo crust. No oven required.
I brought this to a family gathering last month and it was gone in minutes. The kids kept coming back for more. What I like about icebox cakes is they look impressive but the work is simple – you’re just layering and waiting.
This Biscoff Icebox Cake has become one of my go-to desserts for parties. Make it the night before, forget about it, and it’s ready when you need it.
Don’t skip the freezing step. I know it’s tempting, but this is what keeps the topping from sinking. Trust me on this one.
It tastes better the next day. So if you can wait, wait. The cookies soften overnight and the texture is so much better.
One jar of Biscoff is enough. No need to buy extra – half goes into the cream, half becomes the topping. You’re all set.
You got this!
I’ve tested several versions of this cake. Here’s what I learned:
This dessert is rich. I usually serve it after lighter meals or pair it with something that balances the sweetness.
Did you make this? If you snap a photo, please be sure tag us on Instagram at @panlasangpinoy or hashtag #panlasangpinoy so we can see your creations!
This Biscoff Icebox Cake is a creamy, no-bake dessert with layers of Lotus Biscoff cookies and cookie butter cream. Only 4 ingredients needed – perfect for parties and make-ahead desserts.
1 Electric mixer or stand mixer For whipping cream to soft peaks
1 9×9 inch baking pan Use 8×8 for thicker layers or 9×13 for more servings
1 Large mixing bowl For whipping cream
1 Microwave-safe bowl For melting Biscoff spread
1 Plastic wrap Optional, for lining pan and easier removal
Crush 6 Biscoff cookies into small pieces. Set aside for cream mixture and topping.
40 pieces Lotus Biscoff Cookies
Pour cold cream into a large mixing bowl. Whip with electric mixer until soft peaks form, about 4-5 minutes.
500 ml Nestle All-Purpose Cream
Add 5 tablespoons Biscoff spread (warm 10 seconds in microwave first), all condensed milk, and 2/3 of crushed cookies. Mix until combined.
8 oz Carnation Condensed Milk, 13.4 oz Biscoff Spread
In a 9×9 inch pan, arrange Biscoff cookies in a single layer. Spread cream mixture on top. Repeat layers, ending with cream on top.
Cover and freeze for 2-3 hours until firm.
Microwave remaining Biscoff spread for 30 seconds until pourable. Pour over frozen cake and spread to edges. Sprinkle remaining crushed cookies on top.
Refrigerate for 1 hour until topping sets. Slice and serve cold.
Calories: 413kcal (21%) Carbohydrates: 30g (10%) Protein: 5g (10%) Fat: 31g (48%) Saturated Fat: 14g (70%) Polyunsaturated Fat: 1g Monounsaturated Fat: 4g Cholesterol: 54mg (18%) Sodium: 35mg (1%) Potassium: 110mg (3%) Sugar: 23g (26%) Vitamin A: 667IU (13%) Vitamin C: 1mg (1%) Calcium: 81mg (8%) Iron: 0.1mg (1%)
Freeze for at least 2-3 hours, then refrigerate for 1 hour after adding the topping. For best results – soft cookie layers and clean slices – chill overnight.
They need more time to absorb moisture from the cream. Refrigerate for at least 4-6 hours, or overnight. The cookies should soften into a cake-like texture. If they’re still crunchy, give it more time.
Can I make this without freezing?
You can, but the cake will be softer and harder to slice neatly. Freezing firms it up so you get clean squares. If skipping the freezer, refrigerate for at least 6 hours.
Check the peanut butter aisle or international section at SM Supermarket, Robinsons, or Landmark. It’s also available on Lazada and Shopee. Look for the brown jar with the red lid labeled “Lotus Biscoff” or “Cookie Butter.”
The crunchy version doesn’t melt as smoothly for the topping. If you use it in the cream, it works fine – you’ll just have more texture. For the drizzle on top, creamy melts better.
About 30 minutes at room temperature. After that, it starts to soften too much. Keep it refrigerated and only take out slices as needed. It’s best served cold.
Layers of graham crackers with cream and canned fruit cocktail. Easy party dessert.
Rich chocolate filling in an Oreo crust. No oven required.
I brought this to a family gathering last month and it was gone in minutes. The kids kept coming back for more. What I like about icebox cakes is they look impressive but the work is simple – you’re just layering and waiting.
This Biscoff Icebox Cake has become one of my go-to desserts for parties. Make it the night before, forget about it, and it’s ready when you need it.
Keep your cream cold. I mean really cold – straight from the fridge. If it’s even a little warm, it won’t whip. I’ve been there.
Don’t skip the freezing step. I know it’s tempting, but this is what keeps the topping from sinking. Trust me on this one.
It tastes better the next day. So if you can wait, wait. The cookies soften overnight and the texture is so much better.
One jar of Biscoff is enough. No need to buy extra – half goes into the cream, half becomes the topping. You’re all set.
You got this!
I’ve tested several versions of this cake. Here’s what I learned:
This dessert is rich. I usually serve it after lighter meals or pair it with something that balances the sweetness.
Did you make this? If you snap a photo, please be sure tag us on Instagram at @panlasangpinoy or hashtag #panlasangpinoy so we can see your creations!
This Biscoff Icebox Cake is a creamy, no-bake dessert with layers of Lotus Biscoff cookies and cookie butter cream. Only 4 ingredients needed – perfect for parties and make-ahead desserts.
1 Electric mixer or stand mixer For whipping cream to soft peaks
1 9×9 inch baking pan Use 8×8 for thicker layers or 9×13 for more servings
1 Large mixing bowl For whipping cream
1 Microwave-safe bowl For melting Biscoff spread
1 Plastic wrap Optional, for lining pan and easier removal
Crush 6 Biscoff cookies into small pieces. Set aside for cream mixture and topping.
40 pieces Lotus Biscoff Cookies
Pour cold cream into a large mixing bowl. Whip with electric mixer until soft peaks form, about 4-5 minutes.
500 ml Nestle All-Purpose Cream
Add 5 tablespoons Biscoff spread (warm 10 seconds in microwave first), all condensed milk, and 2/3 of crushed cookies. Mix until combined.
8 oz Carnation Condensed Milk, 13.4 oz Biscoff Spread
In a 9×9 inch pan, arrange Biscoff cookies in a single layer. Spread cream mixture on top. Repeat layers, ending with cream on top.
Cover and freeze for 2-3 hours until firm.
Microwave remaining Biscoff spread for 30 seconds until pourable. Pour over frozen cake and spread to edges. Sprinkle remaining crushed cookies on top.
Refrigerate for 1 hour until topping sets. Slice and serve cold.
Calories: 413kcal (21%) Carbohydrates: 30g (10%) Protein: 5g (10%) Fat: 31g (48%) Saturated Fat: 14g (70%) Polyunsaturated Fat: 1g Monounsaturated Fat: 4g Cholesterol: 54mg (18%) Sodium: 35mg (1%) Potassium: 110mg (3%) Sugar: 23g (26%) Vitamin A: 667IU (13%) Vitamin C: 1mg (1%) Calcium: 81mg (8%) Iron: 0.1mg (1%)
Freeze for at least 2-3 hours, then refrigerate for 1 hour after adding the topping. For best results – soft cookie layers and clean slices – chill overnight.
They need more time to absorb moisture from the cream. Refrigerate for at least 4-6 hours, or overnight. The cookies should soften into a cake-like texture. If they’re still crunchy, give it more time.
Can I make this without freezing?
You can, but the cake will be softer and harder to slice neatly. Freezing firms it up so you get clean squares. If skipping the freezer, refrigerate for at least 6 hours.
Check the peanut butter aisle or international section at SM Supermarket, Robinsons, or Landmark. It’s also available on Lazada and Shopee. Look for the brown jar with the red lid labeled “Lotus Biscoff” or “Cookie Butter.”
The crunchy version doesn’t melt as smoothly for the topping. If you use it in the cream, it works fine – you’ll just have more texture. For the drizzle on top, creamy melts better.
About 30 minutes at room temperature. After that, it starts to soften too much. Keep it refrigerated and only take out slices as needed. It’s best served cold.
Layers of graham crackers with cream and canned fruit cocktail. Easy party dessert.
Rich chocolate filling in an Oreo crust. No oven required.
I brought this to a family gathering last month and it was gone in minutes. The kids kept coming back for more. What I like about icebox cakes is they look impressive but the work is simple – you’re just layering and waiting.
This Biscoff Icebox Cake has become one of my go-to desserts for parties. Make it the night before, forget about it, and it’s ready when you need it.
Biscoff icebox cake is a no bake dessert made by layering Biscoff cookies with a light and creamy filling, then chilling until perfectly set. This easy recipe is ideal for holidays, gatherings, or quick dessert cravings.
This post may contain affiliate links. Please read our disclosure policy.
This Biscoff Icebox Cake is one of the easiest no-bake desserts I make. You only need 4 ingredients – Biscoff cookies, Biscoff spread, cream, and condensed milk. No oven, no cooking. Just layer everything, freeze, and you have a creamy dessert with that caramel-cookie flavor everyone loves.
I’ve been making icebox cakes for years – Mango Float, Fruit Cocktail Float, Peach Refrigerator Cake – and this Biscoff version has become a family favorite. The cookie butter mixed into the cream is what makes it different. You get that warm, spiced flavor in every bite.
I like preparing this the night before parties. By the time guests arrive, it’s set and ready to slice.
Biscoff Icebox Cake is a no-bake layered dessert made with Lotus Biscoff cookies and a cookie butter cream filling. You layer cookies with whipped cream, then chill until the cookies soften and turn cake-like. No oven needed – the freezer and fridge do all the work.
Biscoff cookies are those caramelized biscuits you get on airplane flights – the ones in the red wrapper. They have a warm, spiced flavor, a bit like gingerbread but sweeter. The spread (also called cookie butter or speculoos spread) is like peanut butter but made from crushed Biscoff cookies.
Icebox cakes became popular in the 1920s and 1930s when home refrigerators were still new. They were an easy way to make a layered cake without heating up the kitchen. Filipino favorites like Mango Float and Graham Refrigerator Cake use the same idea – layers of cookies or crackers softened by cream.
This Biscoff version gives the classic dessert a twist with that caramel-cookie flavor.
Just a few things I want you to know before you start:
Keep your cream cold. I mean really cold – straight from the fridge. If it’s even a little warm, it won’t whip. I’ve been there.
Don’t skip the freezing step. I know it’s tempting, but this is what keeps the topping from sinking. Trust me on this one.
It tastes better the next day. So if you can wait, wait. The cookies soften overnight and the texture is so much better.
One jar of Biscoff is enough. No need to buy extra – half goes into the cream, half becomes the topping. You’re all set.
You got this!
I’ve tested several versions of this cake. Here’s what I learned:
This dessert is rich. I usually serve it after lighter meals or pair it with something that balances the sweetness.
Did you make this? If you snap a photo, please be sure tag us on Instagram at @panlasangpinoy or hashtag #panlasangpinoy so we can see your creations!
This Biscoff Icebox Cake is a creamy, no-bake dessert with layers of Lotus Biscoff cookies and cookie butter cream. Only 4 ingredients needed – perfect for parties and make-ahead desserts.
1 Electric mixer or stand mixer For whipping cream to soft peaks
1 9×9 inch baking pan Use 8×8 for thicker layers or 9×13 for more servings
1 Large mixing bowl For whipping cream
1 Microwave-safe bowl For melting Biscoff spread
1 Plastic wrap Optional, for lining pan and easier removal
Crush 6 Biscoff cookies into small pieces. Set aside for cream mixture and topping.
40 pieces Lotus Biscoff Cookies
Pour cold cream into a large mixing bowl. Whip with electric mixer until soft peaks form, about 4-5 minutes.
500 ml Nestle All-Purpose Cream
Add 5 tablespoons Biscoff spread (warm 10 seconds in microwave first), all condensed milk, and 2/3 of crushed cookies. Mix until combined.
8 oz Carnation Condensed Milk, 13.4 oz Biscoff Spread
In a 9×9 inch pan, arrange Biscoff cookies in a single layer. Spread cream mixture on top. Repeat layers, ending with cream on top.
Cover and freeze for 2-3 hours until firm.
Microwave remaining Biscoff spread for 30 seconds until pourable. Pour over frozen cake and spread to edges. Sprinkle remaining crushed cookies on top.
Refrigerate for 1 hour until topping sets. Slice and serve cold.
Calories: 413kcal (21%) Carbohydrates: 30g (10%) Protein: 5g (10%) Fat: 31g (48%) Saturated Fat: 14g (70%) Polyunsaturated Fat: 1g Monounsaturated Fat: 4g Cholesterol: 54mg (18%) Sodium: 35mg (1%) Potassium: 110mg (3%) Sugar: 23g (26%) Vitamin A: 667IU (13%) Vitamin C: 1mg (1%) Calcium: 81mg (8%) Iron: 0.1mg (1%)
Freeze for at least 2-3 hours, then refrigerate for 1 hour after adding the topping. For best results – soft cookie layers and clean slices – chill overnight.
They need more time to absorb moisture from the cream. Refrigerate for at least 4-6 hours, or overnight. The cookies should soften into a cake-like texture. If they’re still crunchy, give it more time.
Can I make this without freezing?
You can, but the cake will be softer and harder to slice neatly. Freezing firms it up so you get clean squares. If skipping the freezer, refrigerate for at least 6 hours.
Check the peanut butter aisle or international section at SM Supermarket, Robinsons, or Landmark. It’s also available on Lazada and Shopee. Look for the brown jar with the red lid labeled “Lotus Biscoff” or “Cookie Butter.”
The crunchy version doesn’t melt as smoothly for the topping. If you use it in the cream, it works fine – you’ll just have more texture. For the drizzle on top, creamy melts better.
About 30 minutes at room temperature. After that, it starts to soften too much. Keep it refrigerated and only take out slices as needed. It’s best served cold.
Layers of graham crackers with cream and canned fruit cocktail. Easy party dessert.
Rich chocolate filling in an Oreo crust. No oven required.
I brought this to a family gathering last month and it was gone in minutes. The kids kept coming back for more. What I like about icebox cakes is they look impressive but the work is simple – you’re just layering and waiting.
This Biscoff Icebox Cake has become one of my go-to desserts for parties. Make it the night before, forget about it, and it’s ready when you need it.

2024- All Rights Reserved